Mercedes-Benz Ponton 220S Sedan
Restoration Story / Part 3
by Terry Morgan / t_zmorgan@msn.com
Contents
-
Part 1
history
of the car / sub-frame removal / engine rebuilding / transmission rebuilding
/ front suspension rebuilding / brakes rebuilding / yet to do.
-
Part 2 engine rebuilding (oil pump, cylinder head) / transmission rebuilding
/ steering.
-
Part 3 engine compartment
/ front suspension / engine, drive train and suspension installation / refurbishing
heater boxes / reassembly of engine compartment.
-
Part 4
engine compartment / heater boxes
(restored) / exhaust resonator / heater duct flaps / steering damper / brakes
/ rear axle / starting engine / rust repair / extra sound insulation / suspension
rebound stops / speedometer / cleaning fuel lines / fender straightening.
This is the story of the restoration
of my 1959 220S sedan up through October 2000.
Engine Compartment
I removed most of the parts from the engine compartment
and sandblasted the whole compartment. This process took many months
with my small siphon blaster and slightly-undersized compressor. Since
the car could not be rolled outside while on the lift, I hung tarps and sheets
to make a tent around and under the compartment; this minimized the dust and
sand that would have gone everywhere in the garage. The lift was handy
for raising and lowering the car to select the best height for working.
After the sandblasting, I washed the bare metal with metal preparation solution,
then masked off lines, harnesses, and connectors. I ordered spray paint
from Tower Paint in the original M-B paint code and sprayed the compartment.
I used three 16-oz cans of spray paint.
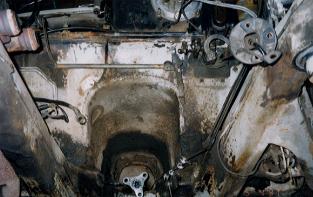
Engine compartment from front and below, before restoration.
|
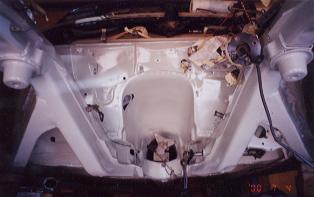
Engine compartment from front and below after sandblasting and painting and
before most masking tape removed.
|
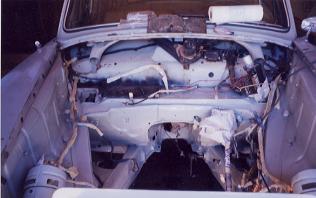
Engine compartment after sandblasting and painting and before masking tape
removed.
|
Front Suspension
I disassembled one side of the suspension
and determined that it was OK, so I did not disassemble the other side.
With my siphon blaster and small silica sand, I sandblasted the sub-frame and started sandblasting the A-arms, but it was too slow. I took a
pile of parts (suspension arms, springs, bumper brackets, hood hinges, etc.)
to a commercial sandblaster with an industrial-strength blaster. For
some $70, he did all the parts in a couple of hours. Do not use such
an industrial blaster on thin sheetmetal like body panels.
After blasting, I took the suspension parts, springs,
roll bar, and sub-frame to a painter who shot the parts with black epoxy paint.
This is not as durable as powder coating, but a lot cheaper and does not require
removal of rubber parts and internal grease that would get cooked during
the heat curing of the powder coat. In hindsight, I would have used
POR-15 – more on this below.
Drivetrain and Suspension Installation (just like factory!)
When I removed the engine and sub-frame from
the car, I used my 4-post lift to lift the body off the sub-frame. I
used the same method in reverse to re-install the sub-frame and engine assembly:
1. I used my engine hoist, with a strap around
the engine, to set the engine/trans on the sub-frame. Two people are
recommended to wheel the sub-frame with the engine/trans installed, because
the wheels will try to turn. To assist in moving the assembly, use
a long (6’ or more) steel bar inserted over the sub-frame under the generator
and under the RR trans mount bracket to lift the rear and steer the unit
(I used rags to protect the new paint). The second person can set a
tall block under the trans to hold up the rear end.
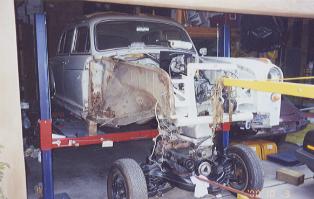
Installation of engine and suspension assembly
|
2. Using the engine hoist with a strap
around the front cross member, I lifted the front of the car off the blocks
and rolled it forward on the lift so the front end overhung the lift.
3. I rolled the sub-frame under the front
of the car and my wife slowly lowered the car over the engine. This
process was very slow and careful, and required several adjustments to the
position of the car body by lifting it with the hoist, pushing it sideways,
and lowering it back on the blocks.
Steering Damper
No progress on the steering damper since I attempted
to disassemble it. It's partially apart but I haven't figured out how
to get the piece off the end of the cylinder. Anyone ever cut one open?
Refurbishing Heater Boxes
The cardboard heater boxes were in poor
condition. After removing and disassembling, I sandblasted them to
remove the old paint. As drastic as this sounds, it actually worked
quite well. The small silica sand quickly removes the paint and does not
remove significant cardboard if one keeps the blaster moving. My boxes
had several holes and torn-out pieces. One side apparently went through
a small fire that charred and removed some of the cardboard; the sandblaster
easily removed the charred material without removing good material.
Here is how I refurbished the heater boxes after
sandblasting them:
| 1. Reform the round ends where the blower motor attaches by making
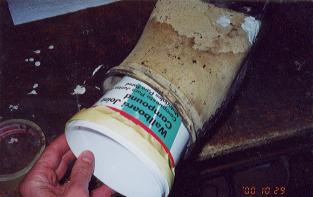
a form from a small plastic bucket (like the ones that hold pre-mixed wallboard
compound). Wrap masking tape around the top outside of the bucket to
build it up to the proper diameter and to approximate the shape of the step
shoulder; use the end of the heater motor housing as a guide for size and
shape. Soak the round end of the heater box in water until it is softened,
then insert the bucket/form. Wrap large rubber bands around the outside
to hold the cardboard in shape and it allow to dry. |
Heater box with small bucket used to re-shape opening of box.
|
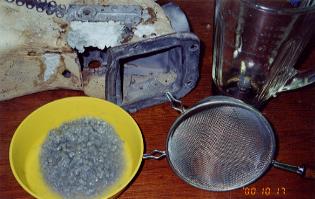
2. Make paper mache by putting about a quarter
of a page of newspaper in a blender, add about one cup of water, and puree
for just a few seconds.
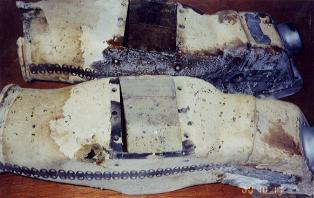
Heater boxes after sandblasting and after epoxy was applied to part of the
box in rear
|
Heater box with holes to be fixed with paper mache mixture
|
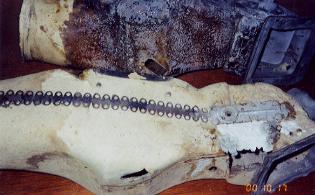
Heater box showing missing area partly fixed with paper mache
|
3. Use the paper mache mixture to
build up and fill in the damaged or missing areas of the heater boxes.
Apply the paper mache as a very wet mixture with your fingers (this allows
you to spread it thinner and avoid large lumps) and gently press to remove
excess water. Blot up excess water with paper towels. Allow to
dry.
4. If needed to cover large areas,
make a small “sheet” of paper mache:
a. Place several layers of towels or absorbent rags on the bench.
b. Place one or two layers of metal window screen on top.
c. Place a large glob of wet paper mache on the screen and slowly
roll it out to a uniform thickness with a suitable piece of pipe.
d. Continue to roll and squeeze the water out into the towels
until it is fairly dry.
5. After all or part of the box is
repaired with new paper mache, coat the inside and outside with 2-part slow
curing epoxy. The epoxy I used is designed for carbon-fiber manufacturing.
You may do part of the box at one time to avoid the need to set it on the
wet side.
6. Use small sticks or other suitable
props to hold the box in shape as necessary. Put a small piece of plastic
(like pieces of sandwich bag) across the ends of the props; the plastic won’t
stick to the epoxy.
7. After coating the box with epoxy,
“cook” it at about 120 degrees. The heat will a) lower the viscosity
of the epoxy to help it to soak into the cardboard and paper mache, and b)
properly cure it for max strength. The epoxy results in a very strong
box.
8. Sand the box to smooth the rough
surface left by the epoxy. Use some body filler for a very smooth look,
if desired. Spray paint black.
Note on use of fiberglass resin: To
coat the cardboard box, I have heard of others using fiberglass resin, which
is significantly cheaper and easier to get than the epoxy I used. However,
the fiberglass resin only allows about 15 minutes of time to apply before
it “kicks” (solidifies), won’t soak in very much before it “kicks,” the vapors
are more hazardous to breathe, and the resin will slowly shrink over many
years.
Reassembly of Engine Compartment
The trick to a good restoration is getting
motivated to thoroughly clean and restore each part so it looks new; this
can be tedious yet rewarding. The fun part is reassembling the freshly
cleaned and painted parts. There will be many hours of detailed cleaning
and fixing, but the end result is worth it.
Some tricks for part cleaning, in order
of preference: 1. Use a sandblaster or beadblaster: it gets all the
corners, removes rust easily, and leaves a great surface for paint adhesion.
2. A wire wheel on a grinder motor: works OK but won’t get into corners as
easily as a sandblaster. 3. Use steel wool over a screwdriver
to get into corners. I used all three methods because using the sandblaster
is a lot of trouble and must be done outside because it makes a huge dust
mess unless you have a blast cabinet. I saw some bench-top blast cabinets
for only about $100 and I am THIS CLOSE to buying one……
I can recommend a product called POR-15
made by Restomotive Laboratories, Inc. It can be painted onto rusty
metal and is extremely durable. I used it on the rear brake backing
plates (after wire brush cleaning), numerous small parts, radiator water
pipes, and I plan to use it on the rear axle and some surface rust under
the floorboards. It leaves a decent finish without brush marks.
I would have used it on the front suspension and sub-frame if I had known
about it at the time; it is much more durable and chip-resistant than the
paint. A friend used it on all his suspension and complete underside
of his Corvair. Check out the website at POR15.com.
For small parts like clips, some screws,
small brackets, etc., I used Eastwood’s Metal Blackening System. This
reproduces the black oxide rust-resistant finish that came on many of these
parts.
Created: November 25, 2000
© www.mbzponton.org
Return to the Ponton Workshop page