The Basic Kit
The untimely death of Randy Durrance on June 7, 2003 at the age of 45 left a void regarding the application of the PerTronix solid-state Hall Effect ignition kits on vintage Mercedes-Benz vehicles. Occasionally, I get inquires about which specific PerTronix Hall Effect ignition kit is right for their Mercedes-Benz. When in doubt, contact PerTronix directly. Be prepared to give them your Bosch distributor number, which can be found either in the shop manual, or on the metal tag located on the side of the distributor itself.
- Jeff Miller / October 2, 2003
|
| Ponton Model | Bosch Distributor | PerTronix Ignitor Kit |
| W120 180 | VJU 4 BR 22 or VJU 4 BR 27 | |
| W120 180b | VJU 4 BR 28 | |
| W121 190 | VJU 4 BR 22 or VJU 4 BR 27 | |
| W121 190b | VJU 4 BR 27 | |
| W121 190/190b [5] | M121.920 head with Bosch VJUR 4 BR 27 T / a.k.a. 0-231-115-027 distributor | 2843 |
| W121 190SL | VJ 4 BR 11 | |
| W180 220a | VJUR 6 BR 24 or VJU 6 BR 24 Bosch Service List (Type 220a) |
|
| W180 220S | VJUR 6 BR 38 | 1864A |
| W105 219 | VJU 6 BR 24 | |
| W128 220SE | VJUR 6 BR 32T or VJUR 6 BR 45T Bosch Service List (Type 220SE) |
1864A |
Mercedes-Benz Type W105 219 Ponton and PerTronix Ignitor Kit 1867A
The PerTronix Ignitor kit part number 1867A fits a Bosch distributor (Bosch 231187001 JFU6) used in a 1958 Mercedes-Benz Ponton Type W105 219 Ponton perfectly.[4]
IMPORTANT: It should be stressed that the distributor found on this particular Type 219 Ponton sedan was not original to the car when new. The Bosch 231187001 JFU6 distributor also fits later W114 Mercedes-Benz models. See Details. The original Bosch distributor for the Type W105 219 Ponton is VJU 6 BR 24
Is the stock condenser used after the PerTronix update?
I get occasional inquiries regarding the ignition modification and whether the stock condenser is still required. Of course, it is not. The original points and condenser are not used after the PerTronix installation.
After several years of making custom ignition systems for Mercedes-Benz Type W109 300SEL 6.3 sedans and 300SL roadsters, I was rebuilding ignition distributors for other models as well. Many of my customers were looking for a system to eliminate their ignition contact points without going the full-ticket ($$$) for a custom made ignition. Since I have had bad experiences in the past with optic-trigger systems (I once worked on Jaguars), I was not interested in using any of the "universal" systems made by Crane (Allison) or Mallory. Some of their kits required adaptations that were irreversible. I tried a kit made by PerTronix and was very pleased with the results. Though the coverage is limited, the pieces fit without changing the distributor internals or housing. Over the last few years I have learned which pieces to mix and match for applications that PerTronix does not list.
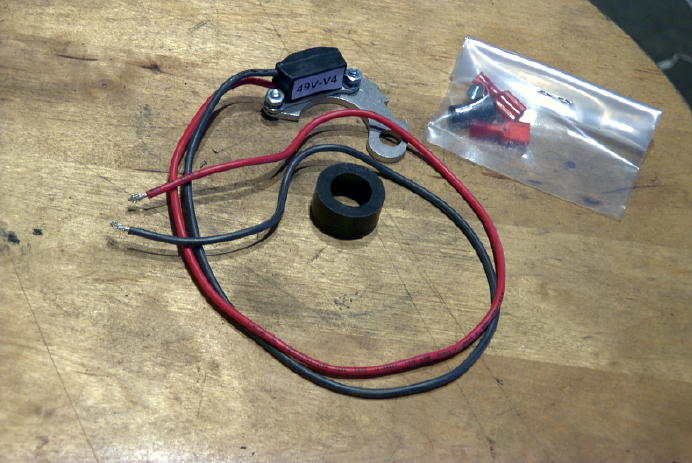
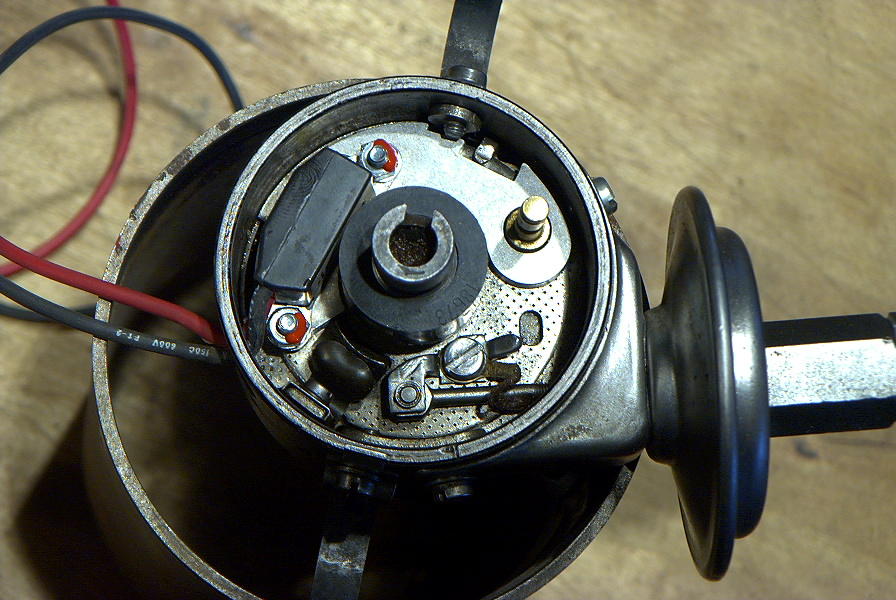
The picture above is all there is. The kit consists of a Hall Effect switch mounted on a bracket and a fitted ring with embedded magnets to trigger it...no external box, no "erector set" brackets, no plastic wheels...just the pieces needed to make it work.

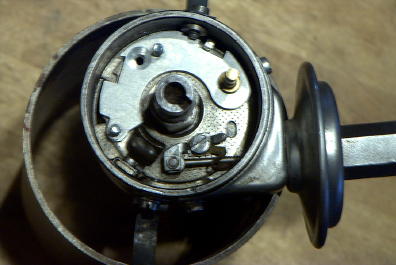
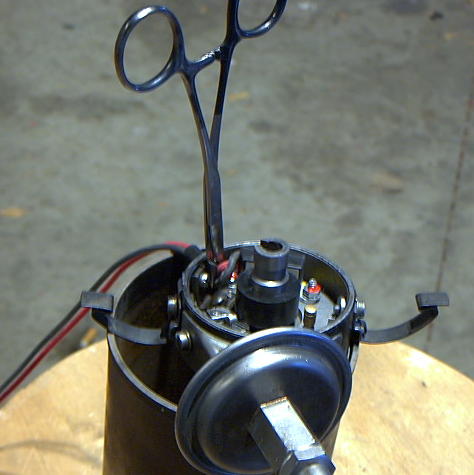
I had been sent a distributor from an early 1960s Mercedes-Benz Type W111 220Sb "Heckflosse" sedan (Bosch distributor V JUR 6 BR 47 T) to rebuild. The customer also wanted to convert from points to an electronic trigger system. The picture above is the rebuilt distributor ready for the PerTronix kit.
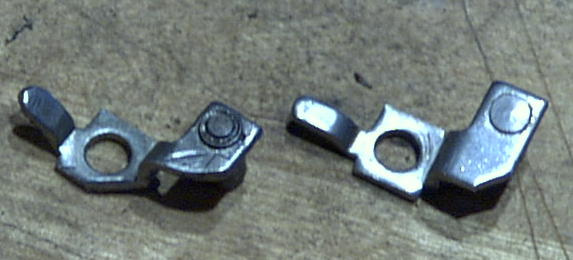
To make clearance for the magnetic collar that will fit over the breaker cam, it was necessary to modify the bracket for the vacuum advance arm. The bracket on the left is the modified version. Easy enough after a few minutes with a die-grinder.
First, the base plate for the Hall Effect trigger is mounted where the ignition points were.
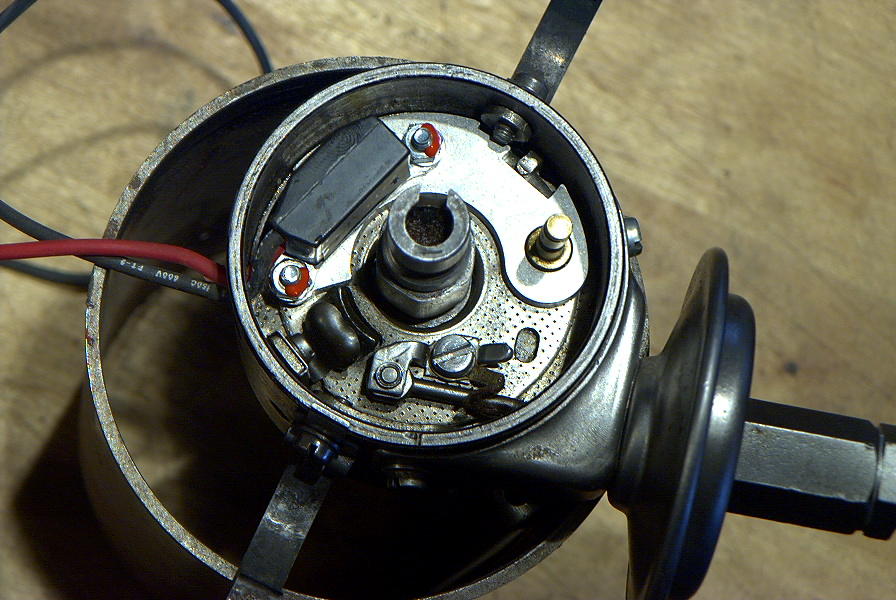
Next, the Hall Effect unit is mounted to the studs on the base plate and the wires are fed through the hole in the housing where the points terminal was.
This part can be a bit tricky. The "flats" inside the ring are hard to see. I usually mark the outside of the ring so I am sure that I have everything aligned properly. It is a tight fit and requires a light tap with a deep-well socket over the distributor shaft to get everything seated.
The last thing that gets done is to seal the hole where the wires pass through the distributor housing. There is usually a rubber plug provided. If not, I use grommets. Make sure there is a bit of slack in the wires to allow for movement of the breaker plate when the vacuum unit operates. Then, I like to use an RTV sealant and clamp the wires in place until it sets.[2]
The wiring for these is very simple. The red wire goes to the positive side of the ignition coil. The black wire goes to the negative side of the ignition coil. The system does require a minimum of 1.5 ohms (3.0 ohms for four cylinder cars) across the two small terminals of the ignition coil. The Bosch "red coil" is perfect for the six cylinder cars and does not need an external resistor. The four cylinder cars just keep the 1.8 ohm resistor that is normally used with the Bosch red coil. It does make for a clean installation since there is no control box needed.
Happy Motoring,
Randy Durrance
Vaughn Smith / January 18, 2006
The PerTronix unit is now installed in my 1959 Mercedes-Benz Type W180 220S Ponton sedan. It fired up instantly after installation. I had a spare distributor that I fitted with the PerTronix kit number 1864A. As mentioned earlier, this part is not specifically supported by the PerTronix company for use with the 220S distributor, (Bosch VJUR 6 BR 38). The unit does fit and works, however. The final installation looks the same as the photos taken by Randy Durrance on this page.
Here are some further notes about the installation process.
Vacuum advance hold down arm modification:
The stock piece will interfere with the PerTronix ring. You must remove material from the arm so that the ring does not bind. You should ensure that there is little or no lateral movement in the distributor shaft towards the arm. It is a close fit afterwards. I had to return the part to the grinder to take off more material. You should be able to rotate the distributor shaft and not see or hear any interference.PerTronix ring installation:
The installed height of the ring is at or below the top of the PerTronix module. It seemed to go on easily, but it was not down far enough. It really needed to snap into place with a little force. Make sure that the painted dot on the top of the ring is lined up with the center of one of the flat spots on the distributor shaft. If it will not go on easily, do not apply too much force. Randy mentions seating it with a deep socket and a hammer. I got it on with simple finger pressure.PerTronix module installation:
It is really hard to get this piece in place. The wires run close to the dist side and one nut so there is little clearance. No socket or wrench that I had would fit between the module and the wires. I used needle nosed pliers to tighten the nut. You need to leave a little slack in the wires to allow for the breaker plate to be moved by the vacuum advance.Locktite:
If you do not have any, get some. When the PerTronix parts are installed, it will be a long time before you need to open your distributor cap. Use a drop of Locktite on the PerTronix module fasteners. You can use red or blue. The blue is easier to remove in the future while the red may require the use of a torch.Vaughn Smith / javr@shaw.ca / British Columbia, Canada / January 18, 2006
Fred Smits / 1957 Mercedes-Benz Type 220S / December 13, 2014
Dear Editor,
Just to advise that in November 2013 we installed the Pertronix 1864A in our 1957 220S Ponton, and have now driven over 12,000 miles with this system without any complaints. To the contrary: major improvement in starting, acceleration and engine performance. Highly recommended.
Best regards,
Elisabeth and Fred Smits
Follow us at
www.ClassicStrider.com
Facebook.com/ClassicStrider
Bob Altenhoff / June 23, 2009
My name is Bob Altenhoff and I live in British Columbia, Canada. My cars are a 1960 Mercedes-Benz Type 180Db Ponton diesel and a 1958 Type 219 Ponton sedan. The Type 219 has a Bosch distributor # 231187001 (JFU6) which was also used in the 1968-1970 W114 250 and 280 models (Len Sokoloff can confirm this). This distributor was also used as an upgrade in the Type W180 220a and W105 Type 219 Ponton 6 cylinder models (Niemoeller in Mannheim, Germany sells them for € 540). I found out from PerTronix tech support that the PerTronix 1867A igniter module fits this type of distributor. I installed the unit in less than twenty minutes. Everything fit; no modifications, grinding, Loctite or silicone was required. The only thing I did was adjust the gap between the pick up coil and the magnet to 0.030 inch with the plastic gauge which was provided in the kit. Otherwise, it fit like a glove. I also installed a 40,000 volt coil with a built in 1.5 ohm resistor, but this was totally optional as it would have run fine with the regular Bosch coil. I must say I am very impressed with the way the car performs now. Also the 1867A PerTronix Ignitor kit sells for $14 less than the 1864A used in the older distributors. I can provide photos if anybody is interested.
Bob Altenhoff / laltenh@shaw.ca / British Columbia, Canada / 1958 W105 Type 219 Ponton sedan / June 23, 2009
Jake Durig / September 13, 2014
From: Jake Durig <j.durig@gmail.com>
To: editor@mbzponton.org
Sent: Saturday, September 13, 2014 3:28 PM
Subject: Addition to Pertronix conversion articleI've been using mbzponton.org a bunch, and the article about setting timing was helpful in getting my 1966 Mercedes-Benz 200D Heckflosse (fintail) running. It's not your average Heckflosse either. It's a 1966 W110 Type 200D, but now has an M121.924, 1.9 liter gasoline (petrol) block from the W110 Type 190c Heckflosse series (04/1961 - 08/1965), and a 121.010 (Type W121 190/190b Ponton) head. So, stuff is Frankenstein in my engine bay, but somehow it works!
In 2005 the previous owner overheated the diesel, and a shop up in Portland swapped the engine (they actually remembered the car eight years later). I saved it from rotting away behind a Ford dealership where it had been sitting for almost three years!
It has a Bosch VJUR 4 BR 27 T distributor, vacuum advance with a dust shield. I was in communication with Pertronix about finding the correct kit for the distributor, and came across an incomplete service manual that listed my distributor, as well as a second part number for the distributor (Bosch 0-231-115-027), which Pertronix listed on their site as having a kit that would fit: # 2843 for "Ignitor I" and # 92843 for "Ignitor II."
I went for Ignitor I (# 2843) and it was almost plug and play. I had to tap over a little bracket in the distributor and shave about ¼" off the rotor base. I escaped having to modify the vacuum advance bracket like the DIY guide was showing for the six cylinder distributor.
Thought it would be helpful to post my results!
Kind regards,
Jacob Durig
Salem, Oregon
1966 W110 200D
http://forums.vwvortex.com/showthread.php?6935565-Saving-Fintail-Charlotte-MB-W110-progression-thread
[1] PerTronix module part number 1864A reference courtesy Vaughn Smith / javr@shaw.ca / 1959 Type W180 220S Ponton sedan / British Columbia, Canada / January 7, 2006.
[2] Be sure to check the finished distributor with the cap and rotor installed to make certain that it turns. In some applications and various rotor designs, it may be required to sand a small amount of material from the rotor's base to get it to seat properly.
[3] PerTronix module part number 1864A reference courtesy Jim Vargo / dorisvargo@comcast.net / 1959 Mercedes-Benz 220SE Ponton / April 23, 2009.
[4] PerTronix module part number 1867A reference courtesy Bob Altenhoff / laltenh@shaw.ca / British Columbia, Canada / 1958 W105 Type 219 Ponton sedan with later (not original to the W105 219) Bosch distributor / June 23, 2009.
[5] PerTronix module part number 2843 reference courtesy Jake Durig / j.durig@gmail.com / Salem, Oregon / September 13, 2014