1959 Type 220S Mercedes-Benz Ponton
Restoration Project - Part 1
Andrew H. Litkowiak / andylit@feralwombat.com / Illinois, USA
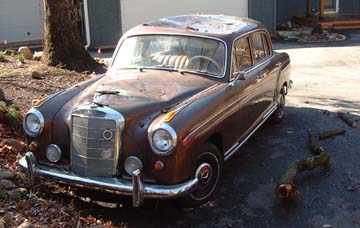
View the 1959
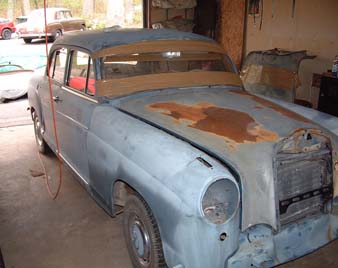
Type 220S before the roof was bashed in by a tree
March 29th, 2004. It is about 8:30 in the AM. I'm sitting in the kitchen, sipping my morning tea, working the crossword.
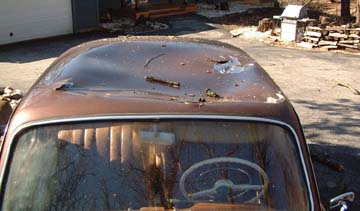
If a tree falls on a Ponton, and no one is there to hear it....?
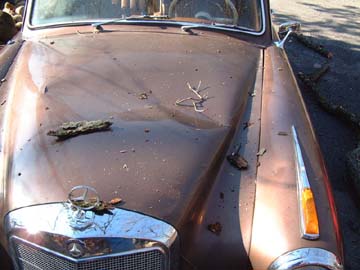
A huge tree limb has broken off and landed....yes, on my 220S.
You haven't had fun until you've encountered this type of morning
YEEEEEAAARRRRGHHH!!!!!!!
If a Ponton owner screams and no one is there to sedate him....?
If you followed the link above to the older pictures of this car, you found my story. As a long time car hobbyist, I felt it was time to buy a car that wasn't a project. Instead of working on the car, I wanted to drive it. Yes Sir, no more wrenching for me. I'm driving that baby.
Yeah. Right. That lasted about 2 weeks. Don't get me wrong. The car is nice. It's eminently drivable. It's everything I wanted. Almost. Sort of.
Never one to leave well enough alone, I discovered little things that needed to be fixed or improved. Some items I took care of, others went on the restoration list. The restoration list is all of those things that really need to be done, but don't make any sense to do unless you do five other things at the same time, but each of the five other things should be done in conjunction with three other related items, but that would mean taking the emblems off so I may as well paint the car while I'm doing it. Got that?
Last fall, the head gasket went bad and the car started blowing white smoke. I intended to replace the head gasket, tweak a few items and drive all this summer. Then, the winter would be all mine to work on the car. Restoration Time!
Some of you may ask, "How does a bad head gasket lead to a restoration?" Well, there are two kinds of people in this world; those who need to ask that question, and those who wondered why it took me so long to decide to restore the car. You know who you are.
For those of us who understand, it is a hard life. We are on the outside, destined to never be satisfied. Fated to see all cars as projects, rather than as end results. Doomed to eternally tinker.
To our friends, neighbors and certain members of the psychiatric profession, I say this.
We Are Not Obsessed. We Are Really, Really Focused!
Okay. Now you know how my mind works. Scary, ain't it? So this next section should not surprise you too much. You really did need all that information to understand the next step in this process.
Fortunately for me, my insurance carrier came through with a fair, perhaps even generous settlement for the damage. This should give me the funds to offset most of the investment into a restoration.
Since the roof and hood have been bashed in (yes, we're finally back on track), the restoration is now a foregone conclusion. If one must do body work, one must paint. If one is going to make the outside look new, one must also make the inside look good. All very logical.
Not so fast. Let's think about this. You see, there is this 220S in Arizona. It's been sitting for many years with an affliction called Restorus Interuptus. Good chrome, good brightwork, very straight body. Interior is shot, but who cares. It sounds like everything I need to restore my car, if only I can get them to part it out for me.
What's that you say? You won't part it out? How much? Wow! Sold, put it on a truck and send it to me. Oh, and throw in another hood. I might need it.
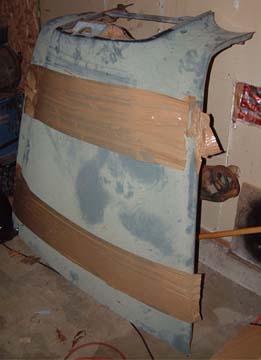
Need a hood? For what, pray tell? Doesn't the parts car have a good hood? Well, it's like this. There's a full Webasto roof and pillars sitting in Pennsylvania. It is now waiting to come home with me. Are you getting the picture yet?
Waiting for me in a barn in Pennsylvania
So, here's the tentative plan. Since I couldn't get JUST the parts, I bought the whole car. Since I've always wanted a Webasto, I jumped at the chance to get one. Wait a minute. I've got two whole cars. Let's keep it that way.
Between the two cars, an extra roof and the insurance money, I should be able to produce two running, driving Pontons. No sense in destroying a perfectly restorable car just for a roof and hood. Besides, I never liked my original Ponton anyway. There just wasn't enough to fix or upgrade.
So, we cut the roof off the Arizona car, paste on the Webasto roof, restore the interior, rebuild the engine and drive train, paint the exterior, then, cut the damaged roof off my brown '59, paste the Arizona roof onto it, bolt on that extra hood, paint the exterior and hit all those little things on the restoration list. Seems simple enough to me.
Remember our Mantra.
We Are Not Obsessed. We Are Really, Really Focused!
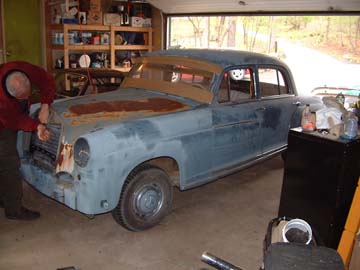
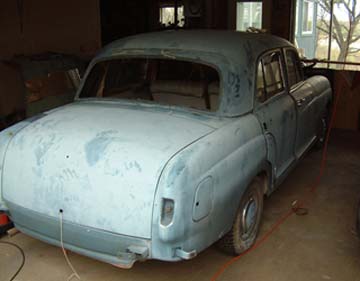
The "donor" Ponton arrived in good order, even if rather late. The shipper had some engine trouble and was delayed a bit. As a result, we offloaded the Arizona car at 12:30 in the morning in the middle of a fairly heavy rain. You haven't had fun until you tried this.
Upon careful examination, the Arizona car is as good as or better than advertised. The interior is definitely toast, but the body is better than expected. No rust anywhere important. What little there is is pure surface with no penetration. I'll address those areas a little later in the project.
The original plan still looks like a good idea. It seems almost criminal to cut the roof off this car. On the other hand, the experiences of others who have retrofitted a Webasto roof lead me to believe that a full scale transplant will be more cost effective and more likely to produce a "perfect" factory install.
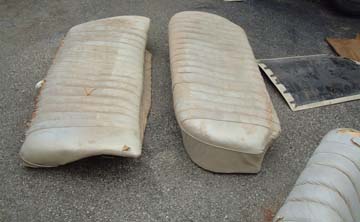
I'm going to tackle the removal of the interior first, then move on to other sections. First item on the list is to remove the seats. The rear seats are very easy to deal with. Simply lift up the seat base and remove. The rear upper is just as easy. These pieces simply slide in and out of their respective slots.
The front seats are a little more of a challenge. I'm dealing with "buckets" here. I'm not sure what the procedure would be for a bench front. The seat and rail assemblies are removed as single units. Each seat is held in place with eight bolts. The bolts hold the rail assemblies to the floor of the car.
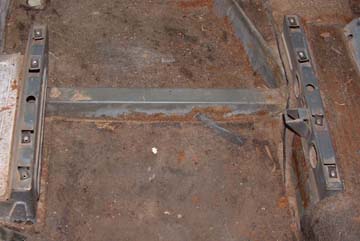
Driver's Side Seat Rail Mounts
The bolts are generally hidden from view. To expose them, one must push the seat to its forward and rear extremes. As you push the seat forward, you will reveal the rear bolts. As you push the seat back, the front bolts come into view. Four of rear bolts also secure the spring mechanisms that keep the seats from sliding freely when the adjuster lever is engaged.
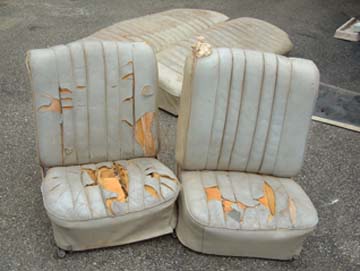
The seat leather is so brittle you can punch your pinky finger through
Before I go any further, a few words of advice. I am not very good with puzzles. Therefore, I try to document my projects very extensively. This isn't done to write neat stories. Usually, a project like this will take a year or more for the home hobbyist. A year from now, after taking apart a whole car, some of the minor details are going to be lost in the fog.
At the bare minimum, I suggest you bag and tag every last nut, bolt and small part, even those that will be replaced. I use standard sandwich and gallon sized ziplocks. Each bag is clearly labeled with a laundry marker. In some cases, individual items within a bag are tagged to distinguish left from right, front and rear or other distinctions that will affect reassembly.
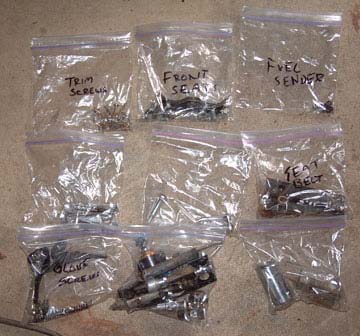
Bag It, Tag It or Lose It
The advent of digital photography is a blessing to the home hobbyist. In years past, I had to photograph with a 35mm. This meant expensive film and developing. Even worse, it meant that I wasn't ever sure I had the shots I wanted until the photos came back from developing. If I waited too long to develop them, I'd usually find a bad shot of a critical item. And, it was usually too late to get another shot because I had moved on in the project.
No matter how good the manuals are, line drawings and factory illustrations simply cannot match precise photos of your car when it comes to jogging your memory. The price of a digital camera today makes it a MUST HAVE restoration tool. Economically, it will pay for itself during the project on film and developing costs alone. On a practical basis, it will be irreplaceable. When time comes to reassemble, you will thank the Benz Gods that you bought that camera.
Back to our project. The seats go down into the basement to be dealt with later. Next step is to remove all the carpeting. This is a fairly simple proposition. Just rip it all out. This car has carpeting front and rear. It was installed during the previously interrupted restoration. It is in very bad shape from exposure to years of weather.
It is my understanding that the Pontons generally did not have carpeting in front at all and the rear carpet was optional. These cars came stock from the factory with rubber matting. That rubber is not present on this car, except for the door sills. It was probably removed during the previous restoration. Once we get to the reassembly, we'll tackle this issue.
This car has lap seat belts that were added at some point. The installation seems to be solid. I simply removed the bolts and snagged the backing plates for storage. I doubt I will reuse the existing belts. The webbing is extremely suspect after 10 plus years exposure to the elements.
Once the carpet is up, you discover the reason for the difference in floor level from front to back. The entire interior cabin floor is a beam reinforced tub. There are several cross braces running laterally. The rear floor is the bottom of the tub structure. The front footwells, on the other hand, is custom cut panels of sturdy plywood or pressboard. These panels rest between braces, providing a higher floor for the driver and front passenger.
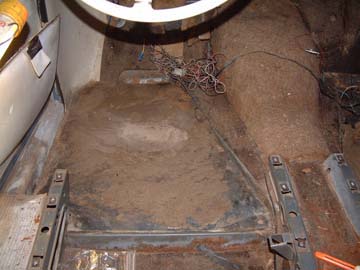
Floorboard In
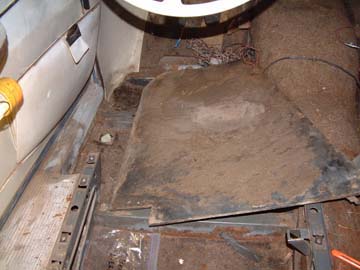
Floorboard Loose
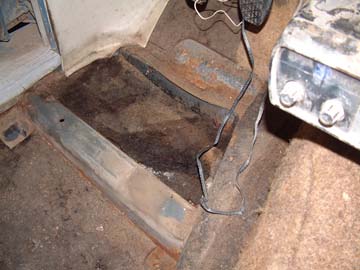
Floorboard Out
Next on the list is the interior trim wood and headliner. One of the nice things about the 220 Sedan over the 2 door models is the interior trim. Sedans came with solid wood pieces instead of veneer. This generally makes restoration much easier, especially if there is significant fading or scratching. Solid wood is much more forgiving than the thin veneer of coupes and cabs.
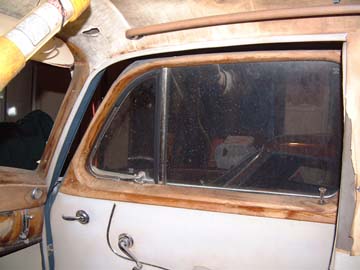
The door wood is very easy to take out. Remove the screws and remove the wood panels. Take some care as the wood can be delicate. In this car, it is very unlikely that the wood will be salvageable. Exposure to sun, rain and temperature extremes have warped and cracked all of the pieces. This too, we will address later on. For now, just bag up all the screws and photograph the position of the felt damper pads.
This is probably beyond salvage by an amateur
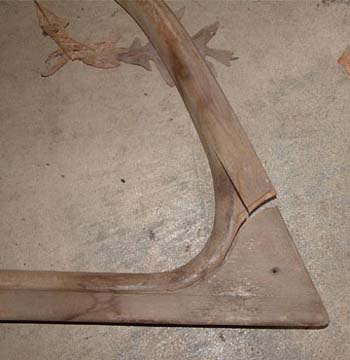
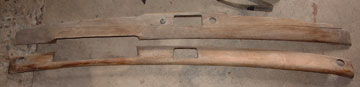
To remove the windscreen trim, you must first remove the rearview mirror. To do this, grasp the mirror and torque it 90 degrees upward toward the roof of the car. Go ahead, it won't break. The mirror arm is on a snap fitting designed to "break" away. This will reveal a bracket with three trim screws. Remove the racket and bag the entire assembly for future use. Then, remove the trim screws and remove the wood.
The wood should come out in 2 pieces. More likely, it will come out in four pieces. Each side of the windscreen trim is made up of two straight pieces joined at the 90 degree bend with glue and biscuits. Usually, the glue has dried out over the years. If that's true in your situation, be sure to be very gentle with the pieces. The biscuits will fall out. They look like long, thin fractured pieces, but they are supposed to be that way. Carefully collect the biscuits and bag them. You will need them later when you refinish your wood.
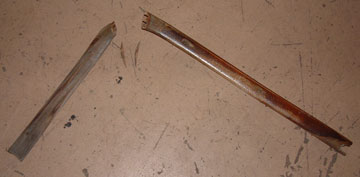
This should have come out in one piece
I tackled the headliner next. Before doing the top itself, you need to remove the covers from the "B" pillars. These are the vertical supports between the front and rear doors. Once again, you will be removing several trim screws on each side. The covers are then removed with a gentle tug.
Before removing the liner, you must remove the hand rails above the doors. First, go to the center support in above the "B" pillar. You will find a recessed flat head standard screw in the shaft. Remove this screw and set it aside. Next, insert a flat screw driver under the chrome fittings at either end of the bar. Twist and these fittings will reveal them selves to be trim caps, concealing the mounting screws.
Once you have removed the bars, be sure to reinsert the small screws into the center support to avoid losing same. The center support posts should then be unscrewed from the body and bagged.
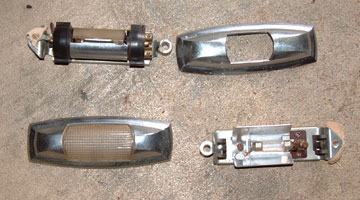
You must next remove the front and rear interior lights. Once again, the covers to these fixtures simply pop off with a flat bladed screwdriver. Once the cover is removed, you will find screws holding the fixture in place. Remove the screws, pull on the fixture, and then remove the wires from the fixtures. Bag the lights and screws.
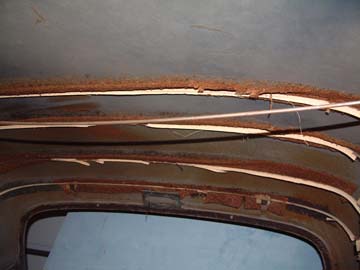
Removing the headliner itself is a perplexing job. In my case, it was a simple rip and tear job, but I just couldn't imagine how a person could get a liner out intact. The edges of the fabric are screwed down under trim strips that are under the liner. To get at the screws you have to remove the liner. To remove the liner (or install it), you have to remove the screws. Catch 22.

The arrow indicates the trim strip
By my best estimate, Mercedes has a work force of gnomes recruited exclusively to install the headliners at the factory. South Park fans may remember the Underpants Gnomes. Mercedes has Headliner Gnomes. It can't be any other way, because no human could get their hands in there to do the work.
Of course, I later found out that there is indeed a way for humans to install a headliner without help from Middle Earth folk. I suspect the liner could be removed intact as well, but we'll tackle that in a later episode. My headliner came out like dry parchment. It may have been original. The bows still had what look like horsehair pads between the roof and the bows.
The bows still have some fabric on them
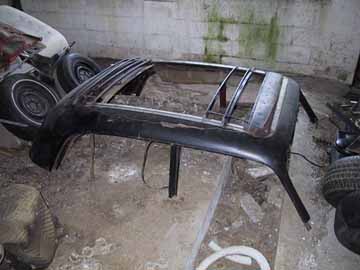
Regardless of how you get the liner out, be sure to pay attention when you remove the steel bows. The bows come out when you push them towards the rear of the car. They will drop 90 degrees, allowing you to flex them and remove the tips from the support frame. Be sure to tag them in the order removed. Each bow is manufactured to fit in the position you found it. If you mix them up, you'll have a really interesting time trying to sort them out a year from now when you try to put the headliner in.
I see one thing that I've missed. When removing the carpeting, and especially the headliner, I strongly recommend that you wear a filter mask and safety glasses. You will be dealing with dust, mold, debris and other matter that has accumulated over a 50 plus year period. The bow pads tend to come out as dust instead of intact. You will get an eyeful and/or a mouthful if you're not careful. You'll also breathe in a pound or so of junk before you even realize it.
Another item to remove and set aside is the fabric insert under the rear window. This is a cardboard template wrapped with fabric or vinyl. In my case, the rain has pretty much destroyed the cardboard, but it should be good enough for a template.
My next step was to tackle the dashboard. As stated earlier, I need to take things apart myself to make it easier at reassembly time. In this situation, I am not so lucky. The previous owner apparently did not complete the reinstallation during the last project. All the switches are in place, but the instrument cluster and upper dash panel are loose.
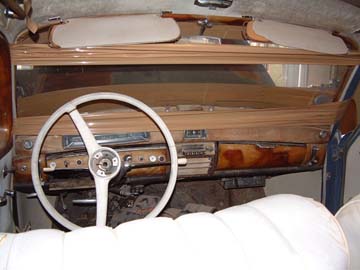
The upper dash is actually two pieces of wood glued together. Mine has been so badly weathered that the glue bond is gone and the dash is in two separate pieces. It remains to be seen if it can be salvaged. Because it's loose already, I'm not sure on the proper steps to get it to that point. Ah well. A puzzle for later.
Once again, this should be a single piece
What is apparent is that the dash must be pulled loose before the switches can be removed. The lower dash parts should be removed as well. First, you remove the heater control levers. This is very simple. Just grasp and pull. They come right out.
Starting on the passenger side, I opened the glove box door to reveal a set of screws on the vertical edge nearest the passenger door. These screws hold in the lower wood panel with the heater controls. Once you pull the screws, the panel comes right out. The outermost edge of the panel uses a pin and socket bracket, so the only screws required are inboard.

The pin is indicated by the arrow
Repeat this operation on the driver's side. In both cases, removing the panels will reveal the heater and air vent control mechanism within the bulkhead.
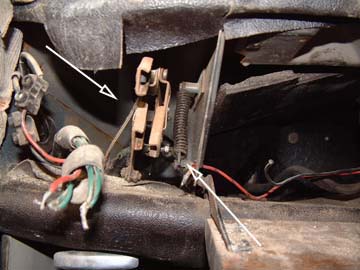
The heater control is left, the door spring on the right
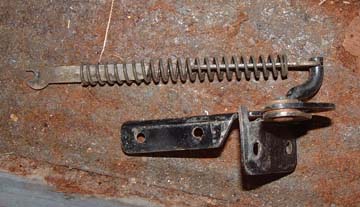
Following this, I removed the two glove box doors. The larger is on the passenger side and a smaller compartment is on the driver's side. Initially, I thought to remove the doors with the hinges attached. This was a mistake. On each door, one of the hinges has a simple but ingenious spring loaded mechanism that secures the door either open or closed. This, combined with the recessed hinge construction makes it difficult, if not impossible to remove the door with the spring mounted hinge still attached.
Next out was the upper portion of the radio. This was very easy. Only two screws secured it, so I suspect it had not been completely reinstalled. The upper radio section consists of the bakelite panel, the speaker and the tuner. It is attached by wires to the power source, which resides under the dash on the passenger side.
With the radio out, removing the clock was very straightforward. Two nuts to release the mounting bracket and the clock comes free. You then detach the three wires at the back of the clock and you're done.
The instrument cluster was loose, but wired and hooked up. The primary electrical connection is found under the cowl near the wiper motor. Approaching from under the hood, you must free up this rectangular connector. It is brown bakelite and looks like an oversized AC electrical plug and socket. The two halves are secured by a pair of small screws. These must be loosened before the fixture will separate.

1 = Socket, 2 = Tripmeter, 3 = Speedo, 4 = Temp Sensor
You must detach the oil pressure tube from the back of the gauge. This is done with a small wrench. The speedo cable is a simple hand turned knob. The tripmeter must be removed as you would a regular switch. Remove the knob, remove the collar and slide the cable and body out of the dash.
The temperature sensor must also be detached. Older temperature sensors like our have a long lead that runs from the engine sensor directly into the back of the gauge. My experience is that it is a BAD THING to try to detach the lead from the gauge while the instrument cluster is in the dash. I always remove the engine sensor and snake the whole thing out through the dash.
I must note that the steering column is also hanging loose. I am note sure to exactly how it ties into the dash or instrument cluster and to what degree it holds them in place. With the column free and the dash loose, I removed the dash switches.
Most of the switches come out fairly easily. The chrome and bakelite knobs simply screw off. This reveals a securing trim ring that snugs the switch body to the dash. These rings typically have two or four small holes at 180 or 90 degree intervals. Obviously, Mercedes has an SST (Special Service Tool) for this process. I used a pair of snap ring pliers with curved inserts to grasp the rings for removal.
Typical switch
Switch removal should be done slowly and methodically. If you intend to reuse your existing wiring harness, you MUST label and tag every switch and every wire as it is removed. Woe unto he who says "Hell with it. I've got a wiring diagram." You will regret your folly. The diagram can only take you so far.
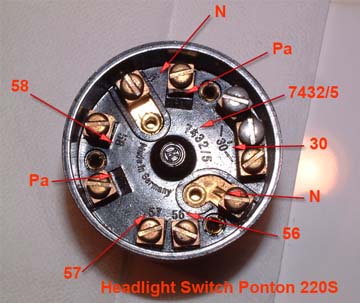
This will be especially apparent when you reach the headlight switch. To my untrained eye, it seems that the entire wiring harness feeds through that switch. Obviously not the case, but there are at least a dozen wires feeding that light switch. In my case, I am not constrained to tag the harness. The harness in this car is brittle and the insulation is cracking off in spots. It will definitely be replaced. If a battery were hooked up to this car right now, I am sure that the magic smoke would leak out of almost all of the wires.
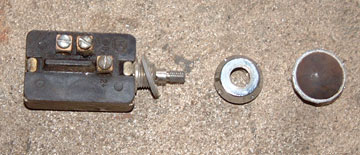
Headlight Switch Base
Also notable, the light switch is removed a little differently from the others. The switch knob does not detach from the assembly in the same fashion. It took me a while to figure this out. The trim ring is unscrewed. This ring secures the entire knob and shaft assembly into the switch body. You remove the entire front half of the switch assembly form the body.
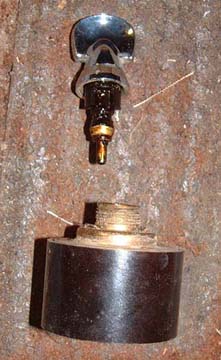
Headlight Switch
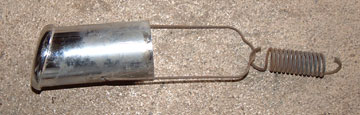
Another item to be removed is the dash air vents. Once again, this is a fairly simple procedure. The cylindrical vents are held in place with a spring attached to a "C" shaped wire fixture in the rear of the vent. Detach the vent hose and detach the spring and out they come.
With all this done, the upper dash comes out, revealing the steel bulkhead. Be sure to note the location of all the felt pads behind the dash. These will certainly be required to eliminate squeaks and rattles when you reassemble.
With all that done, I called it a night and packed up my tools. I'm going to try to keep this log up to date as I work. I can't say when the next posting will be, but I promise you'll be the second to know. In the next installment, we will answer that age old question, "How do I get my fingers out of there without a knife?" For now, Happy Pontoning.
Created: April 25, 2004
© www.mbzponton.org
Proceed to Next Page
Return to the Ponton
Workshop page