Mercedes-Benz Ponton Oil and Filter Change
Jeff Miller /
1957 Mercedes-Benz Type 190 sedan
/ July 6, 2002
Preface
This page chronicles an oil change on a 1957
Mercedes-Benz Type W121 190 Ponton sedan with a 121.923 gasoline engine. Dear
readers, the 121.923 engines (1,897cc) were original to the Type W120 180a and 180b Ponton sedans,
i.e. this car had an
engine transplant at some point in its history.
Regarding diesel engines OM 636 (Type W120 180D, 180Db sedans) and
OM 621 (Type W120 180Dc, W121 190D, W121 190Db sedans) – the location and orientation (horizontal
or vertical) of the oil filter housing may differ from what is shown here. Check the owner's manual
or workshop service manual to verify the location of the oil filter housing
on these models.
Otherwise, the general process is applicable to all Ponton models.
Ammendments
Introduction
Many readers may already know how to change the oil in
their Mercedes-Benz Ponton. It is typically one of the first maintenance jobs
we learn on a car because it does not require much time, money, specialized
knowledge, or tools, and it helps familiarize us with the vehicle. This webpage illustrates the basic steps in performing an important job. If you have not yet tried changing the oil,
this page is for you.
Over an extended period, routine oil changes are one of
the best ways to prevent engine problems. The interval between oil changes
can vary depending on driving habits. Suggested intervals
are 3,000 to 5,000 miles (approximately 4,000 km to 8,000 km) for a car that
is driven regularly, all year long. If the car is driven infrequently, and
sits in a garage most of the time, it is best to change the oil every year, regardless of
the miles driven.
Mercedes-Benz Pontons may be slightly different from other cars
you have worked on, and have some unique features...
-
The oil filter is a replaceable paper element that fits in a permanent metal canister,
which bolts to the lower portion of
the engine.
-
There are two different oil filter designs used on
the Ponton models. The first is a paper filter element with a
wire screen element. The wire screen element requires cleaning every
time the oil and filter are changed.[1]
This article features the later style paper filter element (no wire screen).[2] If
your car is equipped with the early style oil filter with the wire
screen element, be sure to clarify this with your parts vendor because a smaller
paper filter element is required with the wire screen element.
-
Removing the oil pan drain plug requires a 14 mm hex (Allen)
wrench. The wrench was supplied with the original factory tool kit, and may
also be available at automotive specialty stores
and tool vendors. [3]
-
Since the Mercedes-Benz Ponton vehicles are quite
old and perhaps a little rusty underneath, you will need to have a set
of ramps or a floor jack to elevate the front of the car while working under it. The
original jack that came with the car is probably of little
use because the jack points on the body may be structurally weakened by
a less than perfect chassis. If a floor jack is used, then you will
also need a set of jack stands to place under the car in the event the
jack fails. People living in earthquake zones may want to bolster
the car with two tires (mounted on the rims) stacked under several points to
increase the safety factor.
Have These Things Available
-
Owner's manual – to reference exact amount of oil required
-
Maintenance record – to record your oil changes
-
Floor jack or ramps. If you have a lift or pit
in your garage, you probably do not need to read this page.
-
Jack stands for supplemental support should the
floor jack fail
-
New motor oil. See owner's manual for specific amount
-
New oil filter – many
brands include new copper crush ring (oil pan drain plug), aluminum seal
(filter canister bolt),
and rubber O-ring
-
22 mm copper crush ring – for oil pan drain plug (verify with vendor
that it comes with the filter)
- Aluminum seal (washer) for filter canister (verify with vendor that it comes with
the filter)
- 14 mm hex (Allen) wrench for oil drain plug.[3]
- 17 mm
box wrench (or socket) for oil filter canister bolt
- Roll of paper towels (shop grade)
- Drain pan for catching the used oil
- Funnel for refilling engine with new oil
- Sunny day, temperature about 72° F (22° C), light
breeze, few clouds

Oil Change Process
Bring the engine up to normal operating temperature so any impurities will be in suspension
when the old oil is drained off. Drive the car up on ramps to gain easy
access to the oil drain plug and oil filter canister. Place the car in first
gear and place a block of wood behind a rear wheel to ensure the car will
not roll off the ramps while you are under it.

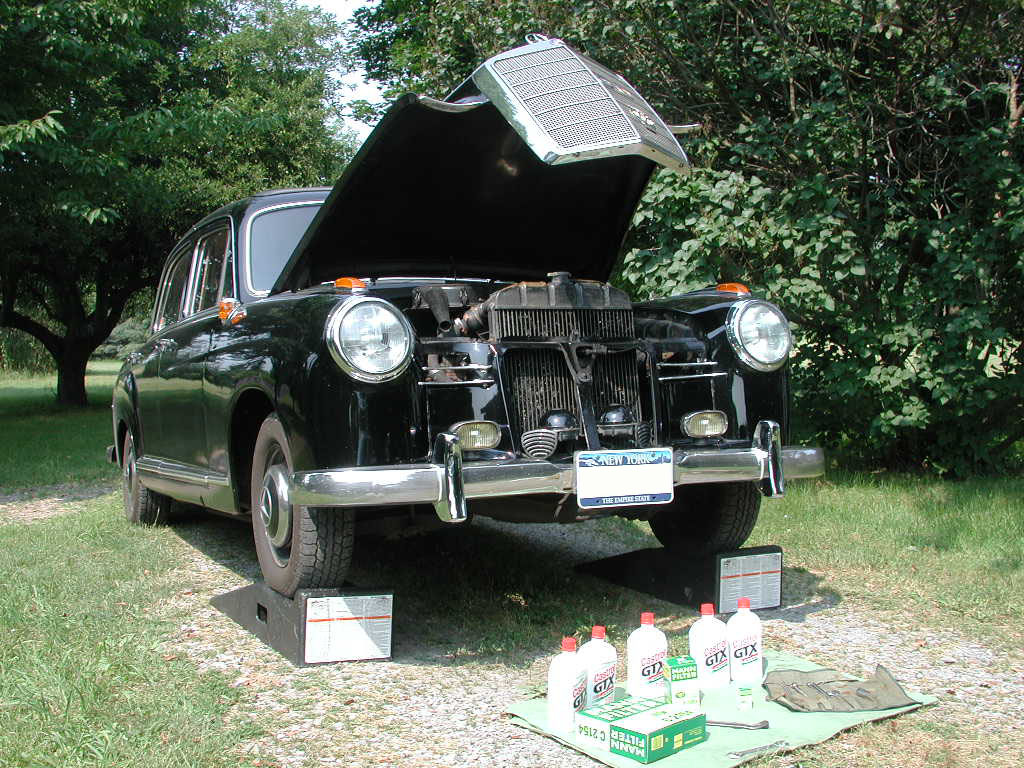
Figure 1. The "patient" – up on ramps with fresh oil, tools and filters
A floor jack can also be used. In this case, jack the
left front of the car up so the side of the engine where the oil filter
is located (the same side for both left hand drive, and right hand
drive cars) will be easier to get under. Be absolutely sure you place
a jack stand under the car so if the floor jack fails you will be safe. Never work under a car that is only supported by a floor
jack.
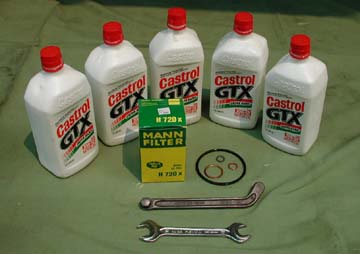
Figure 2. Oil, filter, and tools
This photo shows the motor oil (Castrol 20W-50), new oil filter with rubber
O-ring and seals (supplied with the oil filter), 14 mm hex (Allen) wrench
(for oil drain plug) and a 17 mm wrench (for oil the filter canister). A 17
mm socket wrench may also be used on the filter canister.

Figure 3. Oil drain pan
Place a drain pan under the car to catch the old oil. When
finished, take the container to a service/recycling center so the oil is disposed of in an environmentally safe way. Do not dump the used motor
oil on the ground, into a sewer drain, or down a woodchuck hole.
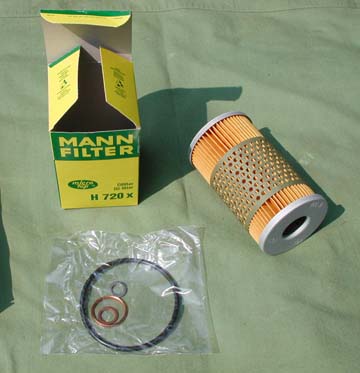
Figure 4. Oil filter, crush ring, seals, and rubber O-ring
Figure 4 shows the paper oil filter element, which slides into a metal canister (see
Figure 9). The metal canister is a permanent
fixture on the car, and is re-used each time the filter is replaced.
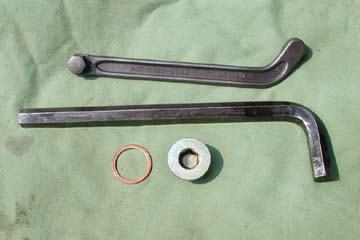
Figure 5. Two 14 mm hex wrenches, a 22 mm copper crush ring (for the oil pan
drain plug), and the oil pan drain plug
This photo shows two different style 14 mm hex (Allen) wrenches. The smaller one
(top) is from an original Mercedes-Benz Ponton tool kit, and the larger
"L" shaped one is from a general purpose automotive supply store. The larger, "L" shaped hex wrench will work well on the oil pan drain
plug because there is unlimited clearance for the tool beneath the car.
However, because of tighter clearance between parts, the original 14 mm hex
wrench will be needed if the transmission fluid is changed. Also note the 22 mm copper crush
ring, and oil pan drain plug. The ring is
usually supplied with the oil filter, and should be replaced each time the
oil and filter are changed. Verify with the vendor that the crush ring is
included with the oil filter, or ask them to include one. They can be purchased
from various internet sources.
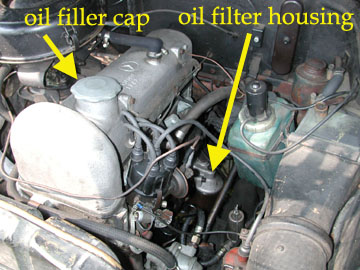
Figure 6. Engine compartment
Remove the oil filler cap to achieve maximum flow into the drain pan
when the plug is removed.
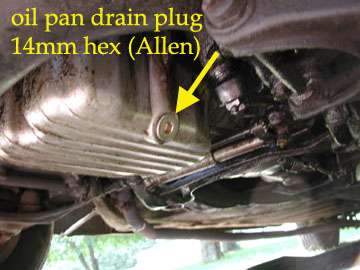
Figure 7. Oil pan drain plug
Position yourself under the front of the car, and place the drain pan under the
plug. Use the 14 mm hex (Allen) wrench to remove the drain plug. The drain plug
is loosened by turning it counter-clockwise. If you have difficulty removing
the plug, it may be over tightened. In that case, try fashioning a breaker bar
(to increase leverage) by putting a section of pipe over the end of the wrench.
Once the plug is removed, let the oil drain for five minutes or until the flow
is reduced to just a trickle. Then replace the drain plug along with the new
copper crush ring (22 mm). New drain plugs are available from the usual
sources. See the Links page
for detail.
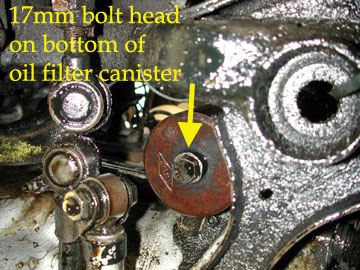
Figure 8. Oil filter canister bolt head (from under car - looking
up)
Get the roll of paper shop towels ready! To gain access to
the oil filter canister, position yourself under the front of the car and
slide far enough back – until you see the canister, or slide under the left side
of the car and move far enough to the center so you can get the 17 mm
wrench on the bolt at the bottom of the canister. Then position the drain
pan under the oil filter canister and proceed to loosen the 17 mm bolt. When
it starts coming loose, the remaining oil will start to flow (all over). When the canister comes completely loose, just let it rest on the steering
and suspension components until it is finished dripping. Then remove it
from the top side of the engine compartment. If you want
to remove the canister from the bottom, you need to tip it, which spills more oil. When lying on the ground holding the canister, the
oil only goes in one direction – up your arm. Removing the canister through the
top of the engine compartment is much neater, you'll agree.
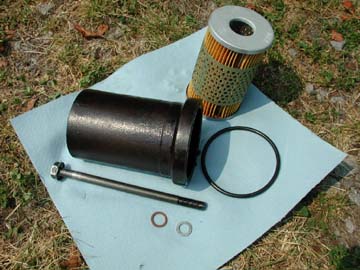
Figure 9. Metal oil filter canister, bolt, aluminum seal, copper washer, and filter (later style).
This is second version of the permanent metal oil filter
canister (reference Table 9 Part #19b below) along with the (17 mm head) bolt,
the rubber O-ring, and paper filter element. Replace the aluminum seal for the
bolt, and the O-ring seal at the top of the canister. Most filters (Mann,
Hengst, etc.) include a set of new seals and rubber O-ring. Also note the paper towel in this photo.
You will need plenty of these on hand before starting the job. Insert the new
paper filter element into the canister, and install it on the car. Crawling
under the car from the front affords the greatest physical and visual access to
where the canister and bolt are installed. The bolt seems barely long enough,
and holding the canister in place while threading the bolt can be a challenging
maneuver.
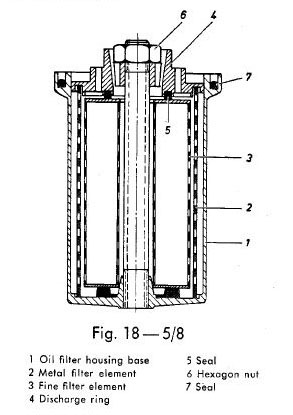
WARNING: REMOVE THE OLD O-RING!
Make absolutely sure the old O-ring "seal" (Fig. 18-5/8 – #7) is
removed before installing a new one. They are deceptively easy to
overlook, and while a second O-ring will probably fit into the
groove without much trouble, it will defeat the seal, and bring
about rapid oil loss once the engine is started. Use a miniature,
flat blade screw driver to probe the groove of the canister where the O-ring sits, and
pry the old one out. Check again for leaks before driving.
|
Supplement 1 / Type W180 220S Oil
Filter Canister
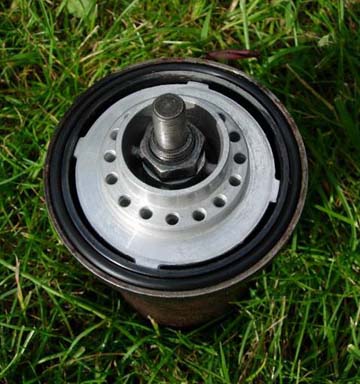
Figure 10. Type 220S oil filter canister
This photo details the top section ("discharge cap") of the
early permanent metal oil filter canister (Table 9 Part #19a) from a 1958 Type
W180 220S sedan.
Parts Visible in this Photo (above)
-
Table 9 Part #19a - housing (canister)
-
Table 9 Part #21 - discharge cap
-
Table 9 Part #23 - sealing ring
-
Table 9 Part #22a - hex nut 14 x 1. 5
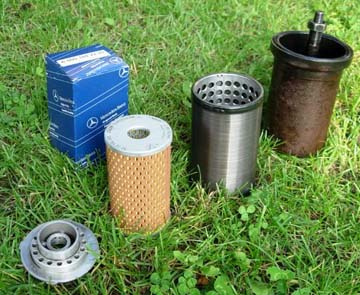
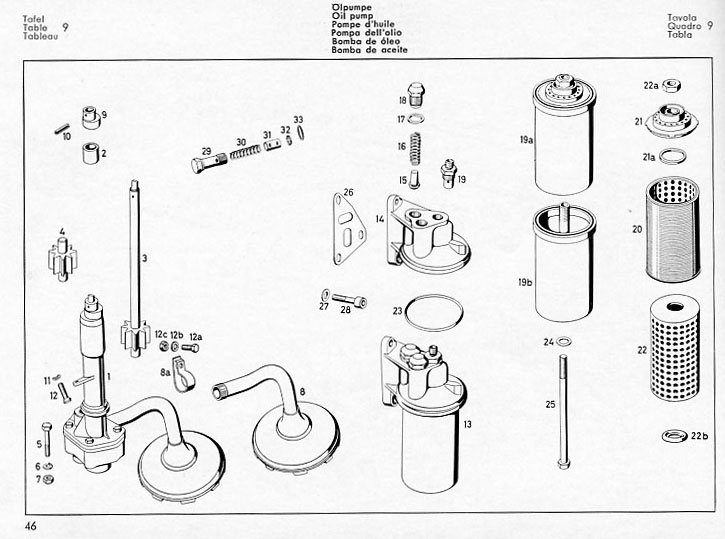
Figure 11. Type 220S oil filter parts (see Table 9)
Parts Needed for a W180 (Type 220a, 220S) Oil Change
-
Table 9 Part #22, Filter element: 000 184 22 25
-
Table 9 Part #23, Sealing ring (for oil filter housing): 181 997 03 41
-
Table 9 Part #24, Sealing ring (for hex head bolt): 007 603 010 107
-
Table 1 Part #39, Sealing ring (for screw plug): 915 035 000 025
-
These individual parts are typically supplied
with the filter elements (Hengst and/or Mann brands) as a complete kit. See the Links page for vendors
of the filter elements.
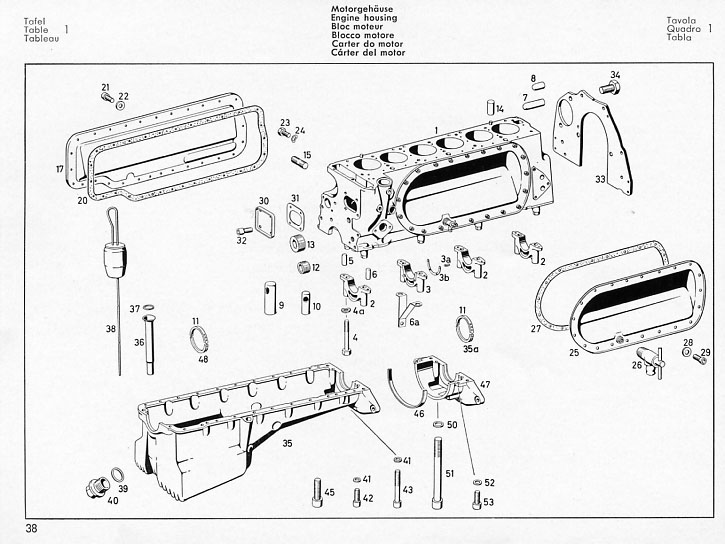
Note: Tables 1 and 9 were both from...
Mercedes-Benz Type 220S
Spare Parts List
Edition D, January 1960
Stuttgart-Untertürkheim, Germany
Pages 2, 22, 124-131

Table 1. Engine Housing.
Part 39: copper crush ring.
Part 40: oil pan drain plug.

Table 9. Oil Pump.
Part 23: rubber O-ring. Part 24: aluminum
seal for oil filter canister.
Supplement 2 / Mercedes-Benz Ponton Oil Filter Part Numbers
Typically (not always) the OEM oil filter supplied by Mercedes-Benz is
the Mann H720x. For M-B filter (000 180 00 09), the following oil filters
were identified as direct crosses. There may be other quality filters.
Some, like the Mann, Hengst, and Knecht include the copper crush ring
(22 mm) for the oil pan drain plug. Some, like the WIX do not, but they can be
purchased from various internet sources.
Ask your vendor if the crush ring comes with the filter. All of these filters are believed to come with the large rubber O-ring for the
top of the canister, which itself is M-B (000 184 31 08).
Note: Fram makes a filter that fits, but has less than half the pleat
count (surface area) as compared to the filters shown here, which results in
far less usable filtering surface. Both Fram and Purolator filters are
not recommended.
Source:
International Ponton Owners Group (IPOG) chat with Doug Broome,
Gary Kuster, etc. / October 27, 2015
|
Mercedes-Benz Ponton Oil Filter Part Number Cross Reference
|
| Brand |
Part Number |
Copper Crush Ring (22 mm)
for oil pan drain plug |
Aluminum Seal (washer)
for oil filter canister bolt
(10x16 DIN 7603)
Source: A, B * |
Copper Seal (washer)
unknown Ponton application |
Rubber O-Ring
for
oil filter canister |
| Mercedes-Benz |
000 180 00 09 |
included |
included |
included |
000 184 31 08 |
| included |
| Mann |
H720x (OEM) |
included |
included |
included |
included |
| Knecht |
OX47D |
? |
? |
? |
included |
| Bosch |
1-457-429-113 |
? |
? |
? |
included |
| Hengst |
OX47D (EH117HD07) |
? |
? |
? |
included |
| Mahle |
H720x |
? |
? |
? |
included |
| Technocar |
OP 830 |
? |
? |
? |
included |
| WIX |
51310 |
not included |
not included |
not included |
included |
| * Sources |
| A |
Illustrated parts
catalog: Original-Teilekatalog Baumuster PONTON 219, 220a, 220S, 220SE
Coupé, Cabriolet (Bestellnummer: L6510000008). 2001/2002 Edition. Soft
cover, 172 bound pages, written in German. |
| B |
Table 9, Part 24. |
Table 2. Mercedes-Benz Ponton Oil Filter Part Number Cross Reference
Table 2 added January 15, 2016
Finishing Up
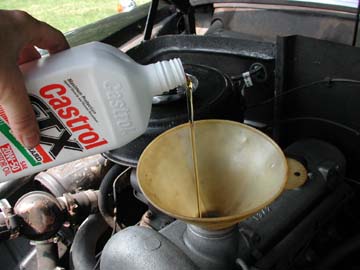
Figure 12. Adding new oil
After replacing the oil filter and drain plug, refill the
engine with new oil. Verify the exact amount by checking the owner's
manual. I use 20W-50 multi-grade oil for the Ponton because it is heavier
than the standard 10W-40 multi-grade, and may minimize leakage around
the old seals.[4]
Replace the oil filler cap. Remove the block of wood from behind the rear wheel
– and any supports placed under the car. Start the engine, and drive back down
off the ramps. With the engine running, check under the car for leaks. Stop the
engine, and check the oil level on the dipstick to make sure the crankcase is filled to the correct level.
| Oil Change History |
| Year |
Mercedes-Benz |
Type |
Chassis Number |
Engine Number |
| |
|
|
|
| Date |
Odometer |
Amount of Oil |
Brand |
Weight |
Filter Changed (Y/N) |
| |
|
|
|
|
|
| |
|
|
|
|
|
| |
|
|
|
|
|
| |
|
|
|
|
|
| |
|
|
|
|
|
| |
|
|
|
|
|
| |
|
|
|
|
|
| |
|
|
|
|
|
| |
|
|
|
|
|
| |
|
|
|
|
|
Table 3. Oil change maintenance chart
Before putting everything away, record
the date, odometer reading, and the amount and weight of oil
used. Also indicate whether the filter was changed. Check the oil
level frequently. It is a good habit to check it at each fuel stop.
Footnotes
[1] Reference:
Service Manual Models 180 to 220SE / S-1201-000 / Job 18-5 / pp. 18-5/3, 18-5/4, 18-5/5.
The wire screen should be soaked in trichloroethylene for a period of time
and scrubbed with a soft brush thereafter. Gasoline will not satisfactorily
clean the element. Trichloroethylene is used mainly as a solvent to
remove grease from metal parts and is sold by the gallon
at most automotive supply stores as "carburetor cleaner" or "parts solvent."
The container will sometimes include a strainer for the parts to soak in.
[2]
The 1957 Type 190 sedan used for this article does not have its original
engine. It has a 121.923 engine from a Type 180a or 180b sedan. A 1957 190 sedan
originally had a 121.920 engine, which used the oil filter with the wire
screen element. This brings up an important point; When ordering parts
for your Mercedes-Benz Ponton, be sure to tell the parts vendor the engine
and/or chassis number of the vehicle. Identifying the car by only the year
and model can lead to confusion – especially if the engine has been replaced. For more
information, visit the Chassis
and Engine Number page.
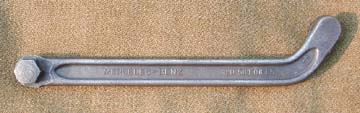
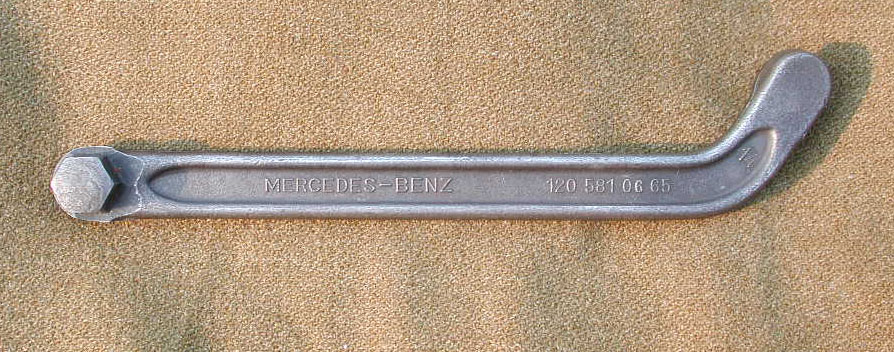
Figure 13. Original style 14 mm hex wrench
[3] Figure 13
shows an original, 14 mm hex (Allen) wrench 120 581 06 65
– as issued with all Mercedes-Benz Ponton sedans, coupés and cabriolets when
new. The contemporary Mercedes-Benz (Daimler AG) part number for
the oil filter combination wrench is 000 589 24 07 00. As of June 2014,
the tool was still available through the Mercedes-Benz Classic Center in
California. See the Tool Kit page for details,
alternative tool brands and part numbers (search for Stahlwille 3677 and Hazet 2760).
[4] Multi-grade
oils can be thought of as two oils in one. Instead of 30W
(weight), which was the normal oil used when the Pontons were built, most
people now use a multi-grade oil like 10W-40. This oil acts
like 10 weight at low temperatures and 40 weight at high temperatures. Why use a
multi-grade oil? To get the best of both worlds. The 40 weight oil flows very
well and provides superior protection at high
temperatures, but is too thick at low temperatures, such as
when the car has been sitting for a while. The 40 weight would
make the engine harder to start, and would significantly delay
the time when the various engine parts received lubrication
when first starting the car. The 10 weight allows easy starting
and fast lubrication, but would not provide enough protection at
high temperatures. So 10W-40 refers to an oil that provides the
easy starting and fast lubrication, plus the good protection
at high temperatures. Other grades of multi-grade oil commonly
found are 15W-50, 20W-50, and 5W-30. Use the lower numbered
grades in winter and if you car is not leaking oil. Higher
viscosity can minimize leaking in some cases, and is more
suitable for summer use.
Created: July 6, 2002 / Jeff Miller
Thanks to Scott Gordon, and Henry Magno
Last Update:
February 23, 2019
© www. mbzponton.org
Return
to the Ponton Workshop page