Narrative
With a moderate amount of mechanical ability, lots of time and patience, a headliner kit can be installed by a do it yourselfer. I purchased my headliner and windlace from Miller's Mercedes, Inc. While not Concours d'Elegance quality, they supplied a product which properly fit, is serviceable, and I'm proud to have installed. See the parts supplier's listing in the Ponton website for a link to Miller's website. The headliner should come with additional pieces of material for use in covering the rear deck, under window area, visors, and door pillars As a hobbyist, working a couple hours at night and on weekends, I took two months to complete the installation, which included removal of interior accessories, headliner, windlace, rear window, rust repair, adding insulation, installation of windlace, headliner, and installation of accessories. Would I do it again? Yes, but not immediately. Am I happy with the finished appearance? Yes, and I have special pride in doing it myself.Disassembly Steps
1) Remove interior appointments; grab rails, mirror, dome lights, door posts, rear seat back and bottom and windshield wood surround. If the center post of the grab rail is difficult to remove, leave it on. Remove the grab rail, however. Tip: Place each part and its associated screws in a recloseable plastic bag.
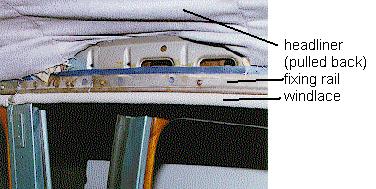
2) Locate small 1/4" rubber tube in the area of the rear seat back, where the headliner meets the windlace (draft excluder). This rubber tube protrudes from a 1-1/4" fixing rail which attaches the headliner and windlace to the roof. With a pair of needle nose pliers, pull out the rubber tube, from rear forward, without breaking the rubber tube if possible . Remove the edge of the headliner from under the fixing rail.
3) With the headliner edge entirely removed (except rear window area), remove headliner by pushing aft on each roof bow, working from front of auto to rear. Remove each bow from its sleeve in the headliner as you work aft. Tip: Number each bow 1 through 7 by tying a numbered tag on the bow as you remove it.
4) Cut the headliner away from the rear window with scissors. Tip: Although the rear window must be removed sooner or later, you may delay this operation. The car remains drivable, if the desire strikes.
5) Remove strip material from bow area in roof of car if you plan to add insulation.
6) Inspect for rust or water leaks. I found the source of water damage to be golf ball sized holes in the top of the rear wheel wells. Water would fling up from the rotating rear wheels, finding its way into the rear window pillar, rusting everything it touches, and staining the original headliner.
6A) If wheel wells are rusted similar to mine, repair rust holes, and paint rust areas with rust inhibitor. I used fiberglass matt and fiberglass resin, using several layers of both matt and resin. A professional would probably weld. Tip: Remove fender bolts in rust area. Replace with new 6x20 x 1.0 bolts. I removed and replaced all the fender bolts to facilitate fender removal at some other time and project. Take care not to fiberglass over join of fender and inner fender.
7) Remove rear window and repair rust as necessary. I found no rust problem in rear window seal area.
8) Remove rear deck cardboard by crawling into the trunk and locating
4 rubber hold-downs and push up with needle nosed pliers on rubber fasteners
from inside trunk. These fasteners are located on aft edge of deck cardboard.
Leading edge of cardboard is held down with the covering material glued to
area of seat back. Remove material covering rear deck cardboard. Save material
for possible use as a pattern. Save cardboard for reinstallation.
Tip: If rear deck cardboard is water damaged it can be flattened (area
other than hinge area), by wetting with water and clamping between 18" 1x10"s.
Allow cardboard to dry while clamped.
Reassembly Steps: Insulation
9) Adhere 4x6' aluminum backed fiber insulation to roof, aluminum side down. Tip: Use the bows to hold the insulation to the roof during the fitting process. Work from the center aft, then center forward. Cut the insulation with scissors around the dome lights and the leading edge as necessary. After fitting, paint both surfaces with a strip of brush on contact cement, again working center aft, then center forward. Again loosely hold in place using the bows. I'm not convinced the contact cement holds single sided insulation adequately. The main support comes from the bows. Tip: Adhere with contact cement any leftover insulation to the rear window pillars. Tip: Learn to pull down (away from roof) on the bows to accomplish final adjustment of bow position. You'll eventually use this method with the headliner on the bows. Tip: Mark the centerline of the roof by stretching a string from the middle of the rear light hole to the middle of the rear view mirror location, and spray with spray paint. The string will create a centerline "shadow" in the paint. You'll use this centerline to line up the headliner on installation.
10) Remove material from door posts. Recover door posts. Use contact cement, (Spray or brush) to adhere new material to door posts. Tip: Allow new material to overlap approx 1" to back. Cut overlapped material to facilitate curves.
Windlace Installation
Skip steps 11 through 14 if not installing a new windlace. Proceed to step 15. The original windlace has material which overlaps the bead by approx 1-1/2." Because the windlace I purchased had a significantly smaller overlap, I found it necessary to sew a 1-3/8" ribbon to the windlace. This overlap on installation, extends above the fixing rail. You can grab this excess above the fixing rail with a pair of needle nose pliers and adjust the fit of the bead at the junction of the door and roof.
11) Remove the old windlace by removing the screws holding the fixing rail to the roof. Tip: To keep track of the rail (which is in 8 sections), immediately reinstall the fixing rail using light pressure on the screws after the windlace is removed.
12) If necessary sew a 1-3/8" ribbon to the windlace to extend the overlapped surface.
13) Measure, cut to length, and screw in the section of windlace which goes over the rear wheel well, as a test installation.
14) Measure, cut to length, and install behind the fixing rail, the windlace for the balance of the car. Note: The windlace totals 6 sections, 2 each wheel wells, rear compartment, and front compartment. Tip: Use a pair of needle nose pliers to pull up gently on the attached ribbon to adjust the fit of the windlace bead against the fixing rail and door frame. Close and open the doors to be sure the fit is acceptable.
15) Insert a paint stirring stick (wood 1"wide x 1/4" thick), under the curved bottom edge of the fixing rail and pry up the edge away from the roof approx 1/4." Test this by prying it up a comfortable distance such that you can push the headliner edge under the fixing rail with the stirring stick, then push the rubber tube under the curved bottom edge of the fixing rail.
Headliner Installation
16) On each sleeve of the headliner, find the center and mark with ink pen. If headliner is excessively wrinkled you might consider a light ironing, taking care not to burn or shrink the fabric.
17) Insert the aft-most bow (#7) in the appropriate headliner sleeve. Insert Bow #7 with attached headliner into the appropriate holes in the roof above the fixing rail. Attach Bow #7 to the metal guide strips forward of the rear window. Line up the center of the sleeve with the center of the roof using previously created marks. Don't worry about fitting the material aft of Bow #7 at this time. With clean hands, from below, gently work the material outward to eliminate the wrinkles. Work from the center outward. Don't adhere the outside edges just yet.
18) Insert the next bow forward, #6, following the same procedure, working the material outward. In addition, pull the bow directly down, and then forward to achieve maximum forward tightness. The bow should be straight when viewed along the bow from just outside the car. Tip: With the headliner I purchased, I found it helpful to cut the sleeve from the outer edges about half an inch.
19) Proceed forward until all bows are installed, and the headliner material is tight and relatively free of wrinkles. At this stage, you will have material loosely hanging down from the perimeter of the headliner. You have not installed the rear, sides and front edges. Tip: Do not overwork the material, as it may show marks and or pilling from your hands. Tip: Take a break, wipe the sweat from your brow, wash your hands, continue some other day.
20) The side edges of the headliner are installed by working from the rear forward. Hold the edge of the material, and use a paint stirring stick, or similar wooden stick approx. 1-1/2" wide by 1/4" thick to gently push the headliner under the rounded bead of the fixing rail. Excess material will remain out. At this point work to achieve a fairly wrinkle free headliner edge. Work forward a few inches then insert the rubber tube under the material and under the bead of the fixing rail. Push in the tube with the paint stick. Work forward, working material and rubber tube, until you get bored. Then cut excess material with a pair of scissors, taking care not to cut the headliner or windlace. Push the trimmed material end out of sight, under the fixing rail. At some point, lay a flat piece of wood approx. 4" long against the rounded edge of the fixing rail and tap the wood with a mallet, to slightly bend the bottom edge of the fixing rail to secure the edge. Work all the way forward. At the grab rail attachment points, you'll have to eventually gather up the courage to cut a small hole in the headliner area to allow the fastener to screw in. If you left the center grab rail support in place, the courage and planning required is enormous. Remember, you are not alone.
21) Next adhere the headliner to the rear reading light area, and window cutout. Use spring clamps and fabric glue, (Duco Cement) to glue to the rear window seal area. Trim with scissors or retractable knife as necessary.
22) Next adhere the headliner to the front reading light area, and window area, with fabric cement, (Duco Cement). Also trim with scissors or knife.
23) Next adhere fabric to rear deck cardboard, leaving approx. 2 inches in front to glue behind seat back.
24) Adhere fabric under rear window.
25) Replace rear deck. Glue material behind seat back.
26) Replace rear seat back and bottom, and all interior appointments.
27) Use a clothes steamer to lightly steam out the wrinkles in the headliner.
I hope this helps.