Mercedes-Benz Ponton Type 220S
Weber Carburetor Conversion
Andrew H. Litkowiak / andylit@feralwombat.com / Illinois, USA
Photos courtesy: JAM Engineering & Scott Gordon
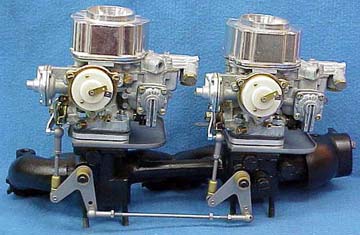
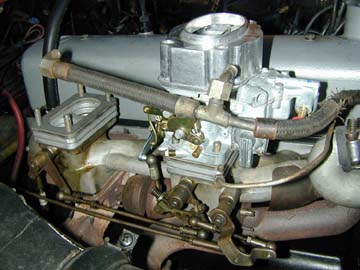
Electric choke Weber
setup
Before we get into the specifics of a Weber conversion, the reader should note that there are two reasons to perform this modification. One is driven by economics, the other is not.
If you are considering a Weber conversion purely for the joy of tinkering, the drive for newer, better, etc., then skip directly to the installation section.
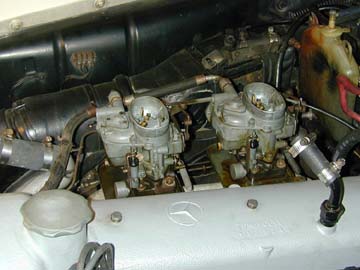
The
original Solex carburetors should look very familiar
And the flip side
If you are experiencing carburetor problems and view this as the only solution, please step back for a moment. As of this writing, a complete conversion kit is about $850. Before laying out this type of money, you should have performed several tests and repairs before reaching the final conclusion that you have no alternative.
In many cases, what appears to be a carburetor problem is in fact related to intake leaks. Gaskets may be going bad, bolts may have loosened up or you may even have a hairline crack in the intake manifold. I would be especially suspicious if you are having an adjustment problem in which you can get the car to idle well with poor road performance, or the opposite.
Before you do anything else, I strongly recommend that you perform this simple test. Remove the air cleaner and start the car. Let it warm up and settle in at a normal idle. Get a can of carburetor cleaner with the little red jet spray tube.
Starting at the base of each carburetor, carefully spray a stream of fluid directly on mating point between the carb and the intake manifold. If there is a leak, the fluid will be sucked into the manifold, causing a brief change in the air/fuel mixture that will result in a noticeable change in engine RPM and sound. Don't get any into the top of the carb or you will get a "false positive."
Be sure to work your way around the entire base of each carburetor. You should then move on to the mating point between the manifold and the head. Over time, manifolds can warp slightly, or the gasket can deteriorate, or the manifold bolts may have backed off slightly. Perform the same test around the edges of the manifold flanges. Once again, if you experience a change in RPM and/or engine sound, you have found a leak.
If you find leaks, chances are strong that you can solve your problems for considerably less than the cost of a conversion. Treat the situation as a good mechanic should, and fix the obvious problems. Even if you end up doing the conversion, you would still have had to take these steps.
If you have a leak between the manifold and the head, you must remove the carbs and the manifold. Lay a steel straight edge across the flange that attaches to the head. Were the bolts loose? Is it perfectly flat? Does it need to be milled? While it's off, get it tested for micro cracks at your local shop. Can you see odd burn patterns on the gasket?
If the leak is under the carb(s), pull it off and replace the gasket(s). Make sure the mating surfaces are clean and smooth. Try not to drop anything into the manifold openings. Foreign particles sucked into the engine are a BAD THING.
Since you have them off, go ahead and rebuild your Solex carbs. You can do it for well under $100 and step by step instructions and photos can be found on the Ponton Workshop page.
So, for about $100 in parts and gaskets, perhaps twice that if you needed machine work on the manifold, you've corrected your intake leaks and rebuilt your stock carburetors. In most cases, you will have eliminated the need for a Weber conversion and saved yourself a considerable chunk of money. You and your Ponton will be happy campers for many years to come and you don't have to read the rest of this article.
On the other hand, if all of these things don't solve the problem, you will have taken care of the prep work required for the Weber conversion. If your Solex carbs have egged out shaft housings or other problems with the bodies, the cost to have them remanufactured could be extremely high and the Weber becomes the more cost effective solution.
So, you're really serious about this conversion thing. Okay then, let's look at Weber conversions in general. Weber kits are well known and frequently used on virtually all carbureted cars and trucks in the world. The kits allow the installer to retain the original intake manifold, original linkages and original air cleaner canister(s). In most cases, the difference in carbs is not noticeable unless you remove the air cleaner. These kits are clean and relatively easy to install.
Although I have not personally done a Ponton installation, I have installed Webers on several older Toyota land Cruisers. It appears that I am one of the very few International Ponton Owners Group (IPOG) list members with Weber experience and the time to write this up. The basics are all the same from car to car, and this article was peer reviewed by IPOG member Scott Gordon. Scott has done a Ponton installation and has kept this on the straight and narrow. He has also supplied many of the photos you will see here.
For most vehicles, Weber offers a standardized kit at Redline. This means that you would have several sources for kits, parts, accessories and the like for your chosen application. In the case of the Ponton 2.2 liter engine, this is not the case. Two critical components are not available through normal distribution channels.
The heart of the Weber conversion kit is the adapter plate system that mates the Weber to your existing OEM intake manifold. Also important, although not critical if you are handy, is the throttle linkage adapter. Neither of these items are currently being made by Weber.
That brings us to JAM Engineering. The owner, John Moulton has engineered and manufactured the plates and throttle arms for our Pontons. In spite of being the single source, this actually works to our advantage.
The primary weakness of all Weber manufactured adapters is that the plates are die-cast instead of milled. This method makes the plates relatively inexpensive and easy to produce, but it is not the most precise method of manufacture. My experience shows that the Weber made plates must be milled flat by a machine shop to avoid manifold leaks.
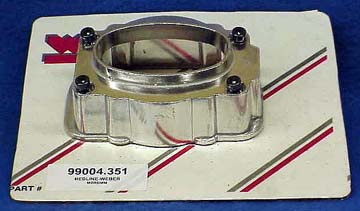
JAM Engineering does not make a cast plate. They are CNC milled out of 1/4" x 3" 6061 T6511 aircraft quality aluminum flat bar stock. This means a very precise mating surface and dramatically reduces the potential for intake leaks. JAM also manufactures their own throttle linkage parts or modifies Weber stock parts to fit.
I've had a few e-chats with John Moulton about the correct kit for the Type W180 220a/220S Ponton model. Based on our engine and chassis information he says that the C-499-M kit is appropriate for our cars. This kit consists of two 32/36 DGV manual choke carbs, manifold adapter plates, throttle arms for linkage connections, adapters to allow use of the OEM air filter, clamps, connectors, hoses, gaskets, etc.
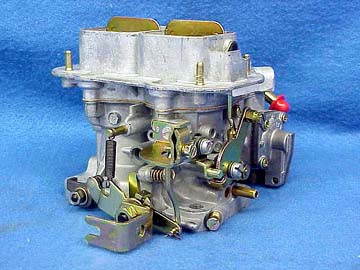
The Weber manual choke version
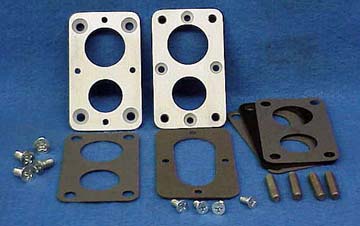
Adapter plates
Air cleaner adapter
After all of this lengthy background, the installation itself is very easy. Assuming you have corrected or eliminated and leaks from the manifold, you are ready to begin.
Remove the Solex carbs, retaining the throttle linkage arms in place under the hood. Remove the old studs from the manifold plates. Clean, clean, clean, but don't scratch or gouge the mating surfaces.
Out with the old
The manifold adapter consists of 2 plates that bolt together under the carb. The bottom plate is drilled to mate to the manifold. The top plate is drilled to mate to the Weber.
Install the bottom plate to the manifold with appropriate gasket. Bolt the top plate to the bottom plate with gasket. Place the drip pan in place with a gasket. Bolt the carb to the top plate, again using a gasket.
One plate on
One carb on
In addition, regardless of instructions, use medium strength thread locker and high temperature, fuel resistant gasket goop. The gaskets are fiber and can leak over time, and the fasteners can back out due to engine vibration. If either of these items are neglected, you will be plagued later on by recurrent low level intake leaks that will drive you stark raving bonkers.
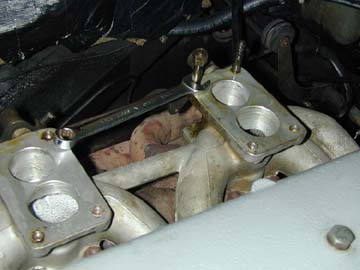
Once installed, you reattach the OEM linkage to the throttle adapter arm that was supplied with the kit. The adapter plates and arms are designed to place the linkage ball almost exactly where it was on your Solex.
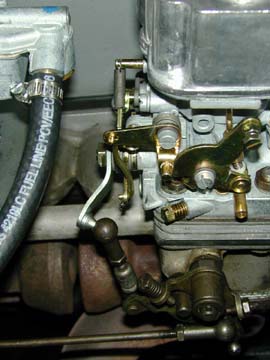
You might have to bend things just a tad
Now we come to the point at which you must get creative. JAM does not supply any type of linkage adapter for the chokes. Study the linkage on the Solex's. As you can see, the chokes need to open and close equal amounts simultaneously. It's not rocket science, but you will have to create a solid shaft transmission leading from the rear choke to the front choke. Scott used a simple piece of coat hanger rod. Just make sure to test the mechanism for even action between both carbs.
You must attach the fuel lines to the carbs as directed in the instructions. Very easy stuff. You must also attach the old vacuum line to the fitting on the base of the front carb. This may be the only modification required to an OEM part. You'll have to remove fitting from the end of the tube and attach it to the barbette on the carb base with a rubber transition tube. The barbette on the rear carb must be plugged or you will have the Mother of All Intake Leaks and will never get the car tuned.
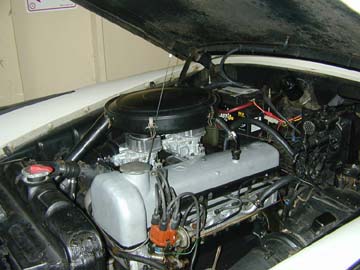
You then bolt the air cleaner adapters to the top of the carbs. These cast aluminum horns allow you to place your OEM air cleaner back in place.
Air canister adapter
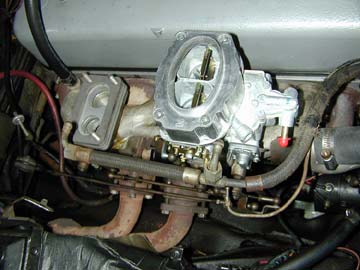
The installation is that easy. I kid you not.
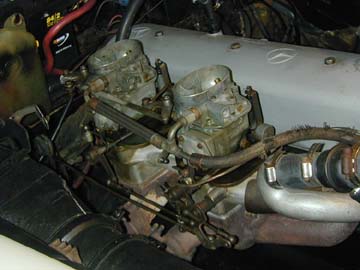
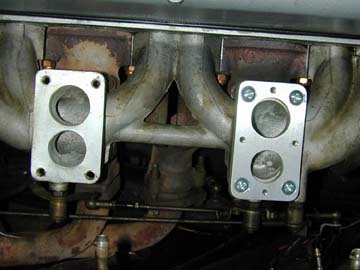
Look closely
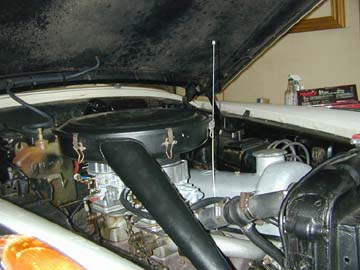
Those are Webers in there
One thing I have not addressed here is jetting. According to JAM, the jetting that comes in the 32/36 should be fine up to about 3,000 feet above sea level. As a rule of thumb you should increase the air correctors one size for every 4,000 feet. Top-End Performance offers a wonderful primer on the subject and also offers jetting kits that you can screw around with at a pretty low cost.
The photos for this article are provided courtesy of JAM Engineering and IPOG member Scott Gordon. The photo of the installed carbs at the beginning of the article shows the electric choke version. The standard kit used in this article comes equipped with the manual choke version.
If you have a source for Weber carbs, you can also buy this kit from JAM without the carbs. In some cases, a vendor may try to persuade you into purchasing the 38/38 version of the carburetor. Although cheaper, I would recommend against this unless you are setting the car up for racing. The 32/36 should provide you with a smooth and fuel efficient driving experience. The larger version is definitely a gas hog and may be difficult to set up for street use.
Once you have gotten everything set up, you can refer back to the dual carb tuning page here on the Ponton Workshop page. Simply follow these instructions using the Weber tuning screws instead of the Solex.
Happy Pontooning!
Andrew H. Litkowiak
Created: March 20, 2005 / Jeff Miller
© www.mbzponton.org
Return to the Ponton Workshop page