Scott Gordon / 1957 220S cabriolet / November 20, 2002
I was doing a little exhaust checkup when I noticed that there was some fluid leaking from the brake on my right rear wheel. This leakage was not apparent 2.5 years ago when I did my inspection of the car pre-purchase. Right-o. The brake cylinder is leaking. I had just looked at Dave Sandlin's new cylinders on his workbench, ready for installation, so I ordered one for me from Dave's source, which was Caliber Motors. The MB part number is clearly shown in one of the photos. The job went so well, I will share it with you.
Needed
new brake cylinder
jack and wheel removal stuff
10mm and 11mm flare wrenches (open end if you are a gambler)
14mm box wrench
extension methods for all above wrenches may be necessary
big can of brake cleaning fluid
big jar of brake (hydraulic) fluid
Why not do a complete fluid change now? This job will go well, so you will have time.
Just follow the manual. A quick review, like I did the night before, will reveal that the job is very simple compared to most cars with drum brakes. You can actually remove and replace the wheel cylinder without disturbing any other parts! No pesky pad removal or drum works disassembly. This makes the job very easy.
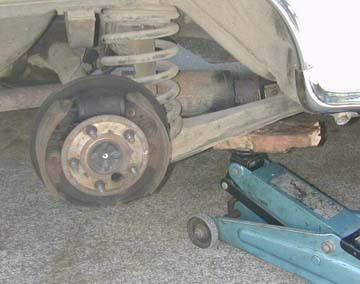
Photo 1. Leak
Photo 1 shows the hub with the drum off. It is clear there is a leak from the discolored gunk on the brake. The photo also shows how I jack the rear wheels, using a wood block under the trailing arm. I find this method very handy and quick. You hardly jack the body up at all to get the wheel off the ground.
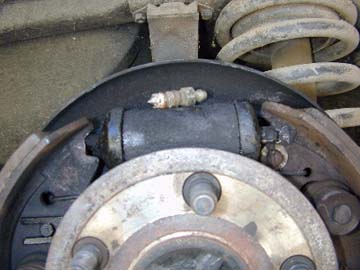
Photo 2. Loose
Photo 2 shows the cylinder partially removed. You pry the shoes away from the cylinder and slip the connecting pins out. The good part is that you can be kind of rude to the old cylinder at this point. Be sure to loosen the brake fluid cap under the hood, and make sure the reservoir is not totally full. As you compress the cylinder you will displace that much fluid back to the reservoir. If it is full and you leave the cap on, bad things will happen, like you could spray fluid around the engine compartment. I find it is best to use a turkey baster to drain most of the fluid from the reservoir before you start the process. You have to bleed the system later, so start with an empty reservoir, and that way you will have almost all virgin fluid when you start bleeding. A turkey baster is really a good tool in the garage. Just make sure you do not take the only one in the kitchen now, this close to Thanksgiving.
Also, before you start being rude to the cylinder, see if it is going to come out completely first. You will need a 10mm flare wrench and an 11mm flare wrench. You can use open end wrenches if you want, but you will be glad if you use the flare wrenches which engage all 6 points of the nut at the end of the brake line and on the bleeder screw. Mercedes in their wisdom saw fit to use two different sizes and since flare wrenches usually come in combination form 9/11 and 10/12, you have to buy two wrenches, only half of which you will use. Good thing they are only about $5 each at Sears. And hard to break!
Like I said, before you do anything, why not see if the brake line is going to come out of the cylinder? Use the 10mm flare wrench and try to turn the line. Wrap your other hand around the axle and the metal brake line to try to immobilize it. If the nut is frozen it is possible to kink the line by twisting, so hold it fast while you turn the nut. Does it come loose? Good. Now use a 14mm box wrench and try to budge the two hex head cap screws which hold the cylinder in place. Can you budge them? Great. Note that you should not remove any of these items just yet. And please do the brake line first while it is still attached by the screws. Once the cylinder is loose, it is harder to get the line undone.
OK, now you can go back and pry the brake shoes one at a time, push the connecting pins back into the cylinder, and try to unhook them one at a time from the brake pads and then your situation will look like Photo 2.
Now you can remove the line completely. Have a coffee cup (see Photo 4) or something handy to catch the fluid which will drain out. Then remove the bleeder screw, and the two screws which hold the cylinder in. Then remove the cylinder.
If you are saving some money by rebuilding your own cylinder you are on your own at this point. I have done it many times and I think it is a bad bargain. If you want to rebuild the one I took out, I still have it, contact the editor of the Ponton website to get in touch with me. If you want this job to take much longer and maybe not get done today, rebuild the one you just took out. Now if the seals you bought do not fit, you are hosed. See? You should have just bought a new cylinder.
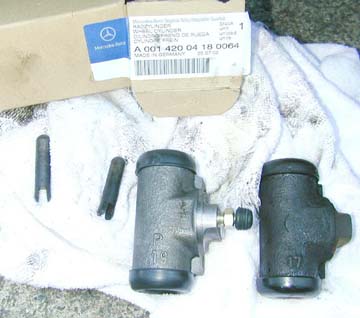
Photo 3. Out
Next comes a very critical step in any remove and replace job. Put the old and the new parts next to each other like in Photo 3. Examine for any differences. My cylinders looked exactly the same, except for these markings (see photo) which were totally different, so I ignored them and put the new one in anyway. On the other side was the number "28" on both cylinders. So I think that is the size and these markings are the plant and date code or something. This photo also shows the box which tells that my new cylinder was made in July, 2002. That is a good thing. Also note that the connecting pins are identical. I kept them separate fore-and-aft until I figured that out.
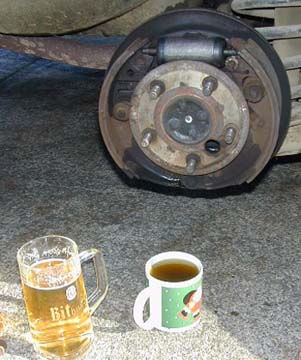
Photo 4. In
Reference Photo 4 — the stein on the left contains Original Qualitie Deutche Brau (on tap). Whether Spaten or Bitburger, it is important to drink real German beer when you work on real German cars !!!! The cup on the right contains old brake fluid.
The new brake cylinder went in really easy, and I used the same connecting pins and compressed the cylinder gently and slowly first, then jockeyed it until it was correct. Again I removed the bleeder screw so I would have an easier installation. Once the cylinder was in place and the pins were in (some brake shoe prying was necessary), then I installed the 2 screws which hold the cylinder, and finally the brake line.
Now is when I would go to work with the brake cleaning fluid. Of course, I could not, because I forgot to buy the stuff, so Photo 4 shows how I left it. But you should do some cleaning at this point. Hey, the wheels are off so you can get up inside the wheel well with a putty knife. Clean out all the dirt that has collected. It is extra weight, and it retains water and encourages rust. So clean it up.
Up to this point, the total time necessary was about an hour, maybe a little less.
Then, I did a complete brake bleeding in the following order
booster top
booster bottom
right rear wheel
left rear wheel
right front wheel
left front wheel
booster top
booster bottom
I mumble this stuff in my sleep.
Bleeding the brakes took maybe another 30-45 minutes. I was done in less than two hours, in time for the start of the football game.
Scott